UPDATE!
This pattern is now available as a free PDF download on Ravlery.
As I mentioned back in
a post from September, I submitted an original pattern to
Knitty for consideration. And while I wish I could be telling you that Amy Singer e-mailed me today to tell me that she loved my apron, she didn't. Instead, she let me know that Knitty won't be publishing this pattern (she was very nice about it, though).
Perhaps I am the only person in the world who would like to own a retro-style skirt apron with cupcake pockets. However, in the event that I'm not, I'd like to share it with my knitting, cupcake-loving blog public. This is in a different format than most of my patterns appear as this in the form in which I sent it to Knitty. So without further ado....
 Cupycakes
by Carissa Marie Bonham
Piquant
Inspired by retro-style skirt aprons, I decided to combine my two favorite obsessions: knitting and cupcakes. With skirt aprons, knitting and cupcakes each making a strong (not to mention sexy) comeback, this would be the perfect apron to wear while you unleash your inner domestic goddess in the kitchen this holiday season. Make it for yourself or as a gift for your favorite cupcake connoisseur.
This apron is knit in 100% acrylic yarn instead of cotton to keep it both washable and from getting too heavy. Superwash wool would be an appropriate substitute, although may be rather warm to wear in a hot kitchen.
Photo credit [model: Carissa Marie Bonham/photographer: Joe Bonham]
SIZE
One size fits S to XL
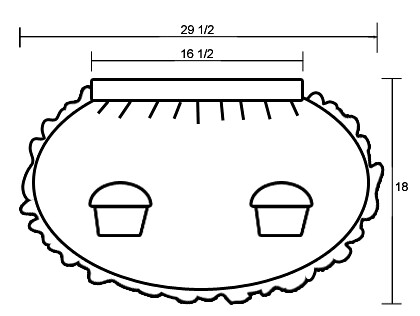
FINISHED MEASUREMENTSWaist band (before adding ribbon): 16.5 inches
Length: 18 inches
MATERIALS[MC] Caron Perfect Match [100% Acrylic; 335 yd/325 m per 198 g skein]; color: Bright White; 1 skein
[CC1] Caron Perfect Match [100% Acrylic; 335 yd/325 m per 198 g skein]; color: Lilac; 1 skein
[CC2] Caron Perfect Match [100% Acrylic; 335 yd/325 m per 198 g skein]; color: Cream; 1 skein
3 US #6/4mm straight needles
2 29 or 32 inch US #7/4.5mm circular needles
Notions
Waste yarn (for provisional cast on)
Size H Crochet hook
Tapestry Needle
3 yards of 1.5 inch-wide grosgrain ribbon in a color matching one of the contrasting colors of yarn
GAUGE
18 sts/25 rows = 4” in Stockinette stitch on larger needles
16 sts/25 rows = 4" in seed bump pattern on larger needles (see pattern notes)
PATTERN NOTES
The main body of the skirt is worked back and forth on one circular needle using Seed Bump Pattern (see below). Due to the large quantity of stitches picked up later, the garter stitch ruffle is worked on two circular needles.
Seed Bump Pattern:
Row 1: K1 *P1, K3*
Row 2: P all sts
Row 3: K3 *P1, K3*
Row 4: P all sts
For the CO sts in the skirt shaping section, I recommend using a cable cast on to make it easier to pick up the stitches for the ruffle later in the pattern
PATTERN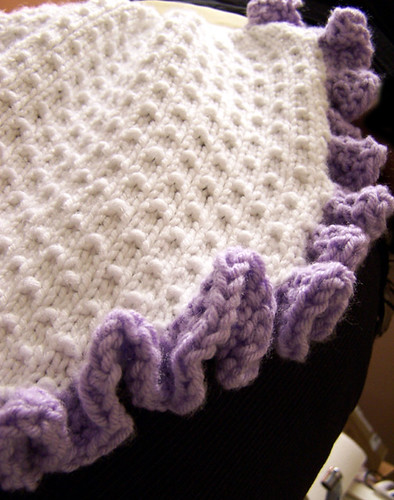
Apron: Skirt
Using one of the circular needles, CO 37 sts in MC.
Foundation rows:
WS: P all sts
RS: K all sts
WS: P all sts
Lower Skirt Shaping:
Row 1: CO 8, K1 *P1, K3*
Row 2: CO 8, P to end
Row 3: CO 8, K3 *P1, K3* to last 2 sts, P1, K1
Row 4: CO 8, P to end
Repeat these 4 shaping rows once more as-is.
Repeat one more time without CO sts.
Increase Rows:
Row 1: kfb *P1, K3* to last st, kfb
Row 2: pfb, P to last st, pfb
Row 3: K1 *P1, K3*
Row 4: P all
Row 5: kfb, K2, *P1, K3* to last 2 sts, P1, kfb
Row 6: pfb, P to last st, pfb
Row 7: K 3, *P1, K3* to last 2 st, P1, K1
Row 8: P all
Repeat all 8 increase rows 3 more times (you will have 133 sts)
Continue working in Seed Bump Pattern until skirt measures 15 inches from CO edge. End on a WS row.
Waist Band:
RS: *K1, k2tog, K1* to last st, K1
WS: P all
RS: K3tog to last st, K1
WS: P all
RS: *K1, P1*
WS: *P1, K1*
Repeat last two rows 4 more times
Loosely BO all sts in pattern.
Apron: Ruffle
Ruffle is worked using two circular needles. Begin with one and add second needle when necessary.
Using CC1, pick up 6 sts on side of waist band, pm, pick up 230-250 sts around perimeter of skirt to the bottom of waist band, pm, pick up 6 sts along side of waist band.
WS: P6, sm, *kfb* until marker, sm, P6
RS: K all
Repeat these two rows once more.
WS: P6, sm, K to marker, sm, P6
RS: BO all sts loosely
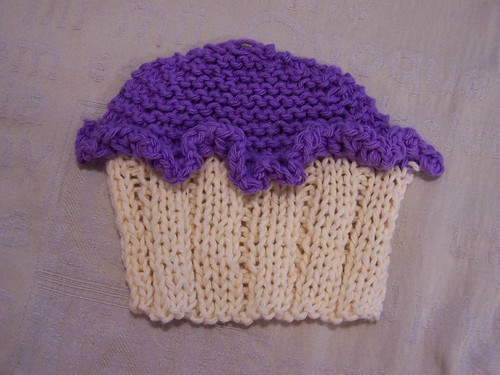
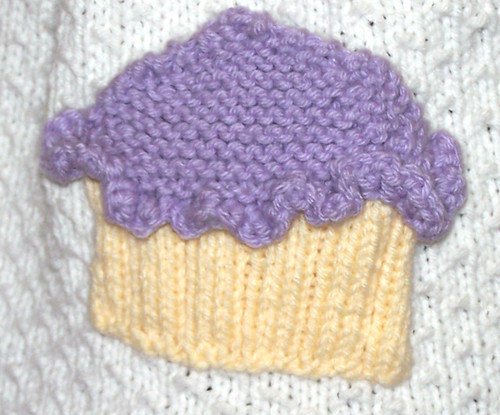 Cupcake Pockets (make 2)
Cupcake pockets are worked back and forth on sz 6 straight needles.
Cupcake bottom:
Using CC2, CO 23 sts
RS: *K3, P1* 5 times, K3
WS: P3 *K1, P3* to end
Repeat these two rows 6 more times
Leave sts on needle, break yarn and set aside
Cupcake Frosting:
Using scrap yarn and crochet hook, CO 23 sts using provisional CO method
Connect CC1 to provisional CO and work as follows:
Rows 1 and 2: K all
Row 3: K2, ssk, k to last 4, K2tog, K2
Rows 4 and 5: K all
Repeat rows 3-5, 3 more times
Next row: ssk, ssk, K to last 4, k2tog, k2tog
Next row: K all
Repeat these two rows once more
Next row: ssk, K3, k2 tog
Next row: ssk, K1, k2tog
BO all stitches
Joining Cupcake pieces:
Turn Frosting piece over and use knitting needle to pick up CC1 stitches from back of provisional CO (count to make sure you have 23 sts!). Unzip provisional CO and set aside.
Pick up the bottom portion of the cupcake set aside earlier.
Join CC1 and knit across one row
Hold the bottom and frosting pieces, wrong sides together, with the needles pointing the same direction.
Use third knitting needle to knit the first stitch on each needle together
Continue across until all stitches have been knit onto the third needle. You will have 23 sts.
Frosting Ruffle:
This technique might be a little different than anything you’re used to but I think it provides the best “frosting” ruffle effect:
Hold the knitting needle with the live stitches in your left hand and the crochet hook in your right hand.
Using the crochet hook as if it were a knitting needle, knit the first stitch off of the needle.
You will now have 22 sts on your needle and 1 loop on your crochet hook.
Use crochet hook to SC three times into the base of the knit stitch.
Once again:*use crochet hook as a knitting needle to K the next st off the needle (there will be two loops on the crochet hook), wrap yarn from back to front on crochet hook and draw through two loops on crochet hook (there will now be one stitch on hook), work 2 SC into base of st*
Repeat directions between **’s until no more sts remain.
Break yarn and draw through
FINISHING
Weave in ends of cupcakes and apron.
Sew the cupcakes to the apron around their bottom portions to form pockets.
Center and sew the ribbon across the top of the waist band beginning in the center. Try on your completed apron and cut ribbon tails to a length that suits you.
I hope someone other than me enjoys this pattern. You can also find it on Ravelry here.
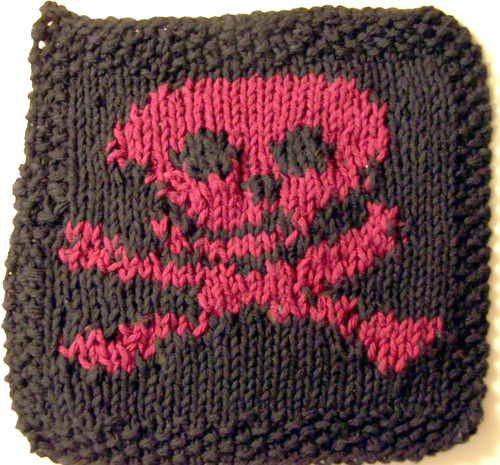
If you're looking for gift knitting ideas, I think this apron would make a cute "domestic goddess" gift set by pairing it with a
cupcake dishcloth or two.


