Showing posts with label container gardening. Show all posts

Sunday, June 3, 2012

2012 Home Garden Update: May

I got a late start on my seeds this year so I'm not going to be able to grow as much from scratch as I had originally hoped.

This is my 2012 seed starting operation. I'm re-using single serve yogurt and food cups and colored craft sticks from my dollar store.

Two weeks later...

I'm working on filling in the front of my courtyard with white and purple sweet alyssum. I'm hoping it will fill in nicely and re-seed on its own so that I can have some low maintenance flowers. I'm also seed starting some candytuft, aubrietta and rockcress so that I have some true perennials there, too.

This rose bush came with my house and was cracked out on chemical applications and not very happy when we got here. Three years later, with some love, pruning and compost, it's so beautiful and happy. This is the first bloom of the season. I have lots of buds waiting to burst open, and I'm hoping to make rose petal vinegar and rose petal jelly.

The aphids have arrived a bit early this year. I bought a small package of live ladybugs and released them in my garden overnight. This is the first year I've used ladybugs and was surprised that since releasing them, I haven't found a single ladybug on my rosebush (where aphids tend to congregate) but I can almost always count on finding at least two hanging out on my lavender plant (which as far as I can tell is pretty pest free) at any given time.

My container strawberries are blooming. I followed my own advice on how to increase yield by plucking off the first flowers and berries of the year to get a better yield. They are re-generating large beautiful berries now and hopefully in my June update, I'll have ripe red strawberry pictures to share.


Saturday, June 2, 2012

Gardening Quick Tip: Strawberries

Oh, the first strawberry flowers of the season! I get so excited when I see them because sweet fresh berries are just around the corner.

What can you do to help increase your berry yield? It seems anti-intuitive: Pick off the first flowers and small berries.

See these? They seem so sweet. No, friends: they are the enemy.

If you leave these tiny flowers, your plant will make tiny berries. Pick off the first tiny berries and flowers and your plant will think it's under attack and respond by making even more and bigger berries....which means more strawberry shortcake for you. You're welcome.

Thursday, July 7, 2011

How Does Your Garden Grow?

This is the first year I've really gotten serious about doing a garden journal. I've been taking pictures of my garden in progress to put together into a photo book at the end of the season. I've also been labeling some of the photos with what kinds of seeds I used so I can keep track of which things are doing well.  The first one I did of my plants in May looks like this:


If you save your layers in photoshop and keep standing in about the same place, you can drop a new pictures in every so often and just make minor adjustments to make sure the arrows are still pointing at the right plants. I love watching the progress of how things are growing.


Here are some progress pics of my front planter (One pic for each month. Also, if you'll remember, it used to look like this!)


Friday, June 3, 2011

Our front yard: A Journey

2009
This is what our front yard looked like when we first moved in three years ago:

This was the inside of the courtyard, up against the house where we keep the main part of the garden:
not really much if you ask me. A few funky bushes (including some who did not fare the winter so well and turned into round balls of sticks)

Thursday, May 5, 2011

Funky Plant Markers (and mini-tutorial)

Silverware plant markers are by no means an original idea, but I sure love how they look!  I'm getting ready for a Spring Garden and Crafts fair on my family's farm next month and I've made a few of these both for my garden and for the fair.

I've got some "serious" ones for actually labeling plants:

And some fun ones that say more clever things:

Read the rest to check out how I made them:

Saturday, August 2, 2008

The tale of a confused tomato

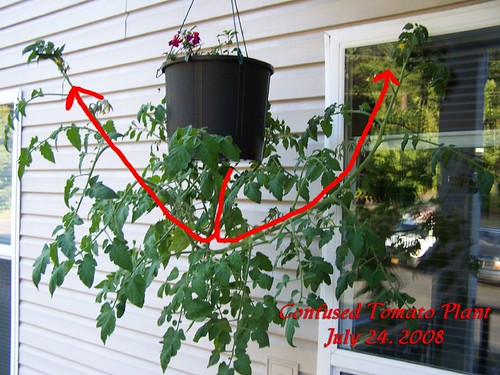
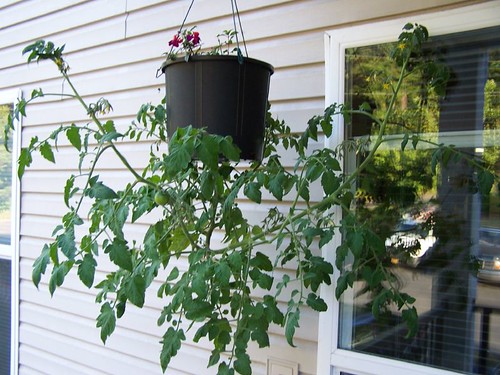
As I showed in my last post, my upside-down tomato is a little confused about this growing in a hanging pot business and was doing this:

The very friendly people in the container gardeners group on Ravelry told me that as the fruit get bigger that the stalk will straighten out. Since the plant in the above picture already had 13 fruits on it, I thought it would gradually get pulled down as the fruit get bigger and heavier.

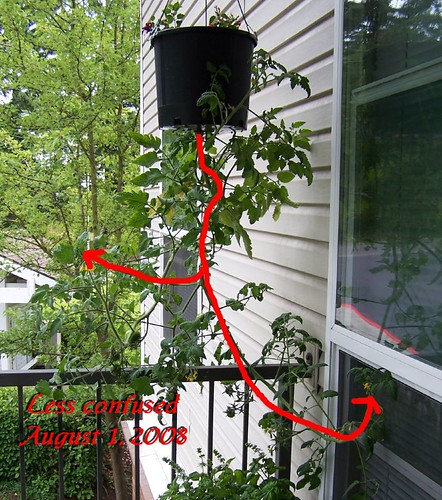
So went to work on Thursday with the plant looking exactly as it does in the above picture but when I came home it was doing this:

It almost completely straightened out over a 6 hour period!

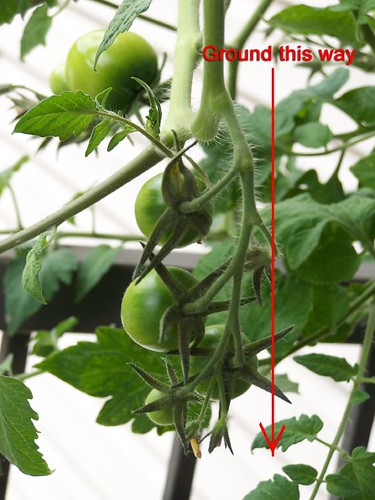
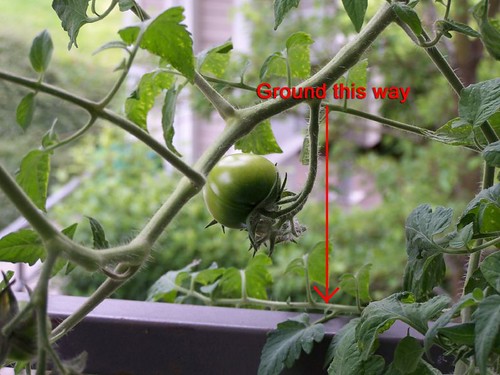
But now that the stalks are growing down, the stems and the fruit (which had been growing parallel to the ground) are now growing sideways:


I hope the stems re-correct as well because I'm worried as the fruit gets bigger that gravity might start pulling it off the stem pre-maturely.

Tuesday, July 29, 2008

Garden pics

In non-knitting, non-cupcaking news, this is what I've been up to:

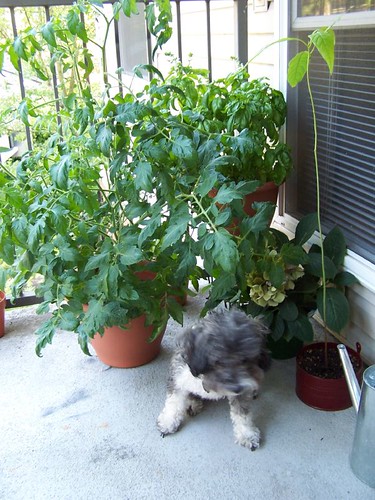
(apprehensive dog for scale)

I've been growing a mini-garden on my back porch.

I've got 2 tomato plants (one regular, one upside down), a basil plant, a very sad looking hydrangea, an avocado tree sproutling, and some morning glory/beans.

Tomato #1 is in the picture above. While it's very large and bushy, it has no tomatoes. It had quite a few flowers but they seem to be infertile. I'm curious to see if maybe it will get some later.


Tomato #2, I'm growing upside down.
I drilled a 1.5" hole in the bottom of a 5 gallon pot, put coffee filters around the hole so the dirt wouldn't fall out and threaded a (much smaller) tomato start through. It did okay like this for a while but then decided to rebel (red lines show how the stalks are growing):

It grew down for a bit but then did a u-turn up to the right. The fork to the left is actually just a really big branch coming off the main stalk. Both are growing in a decidedly upward fashion.

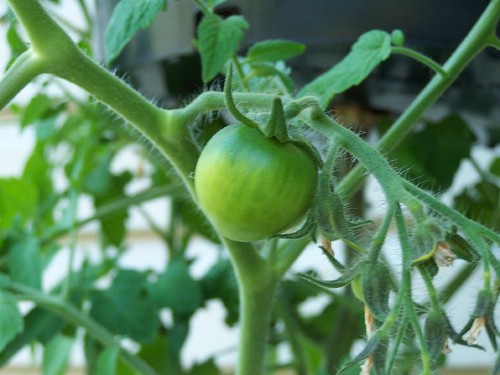
And while it's definitely an "interesting" looking plant, it was the first one to make one of these!
There are currently 13 tomatoes growing on the upside-down plant with many more pregnant-looking flowers that I'm sure will turn into tomatoes soon. :-)

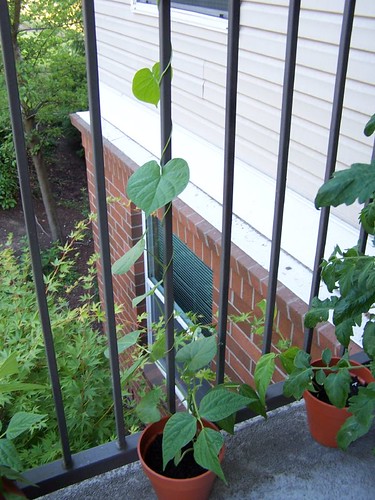
The Vines are not cooperating. I had this vision...the bars on the side of the porch covered in beautiful vines sharing their bounty of morning glory flowers and green beans with me. I planted both morning glories and beans in smaller pots and spaced them out along the fence.


This pot didn't get the memo:
Since I took this picture last week, the beans have since flowered and are growing mini-beans....but they forgot to climb. They're just hanging out near the pot. The morning glories in this pot were trying to climb the beans so I tried to re-direct them to the rail and now thery are being grumpy at me.

This is the only pot of the 4 which is doing what it's supposed to:
The bean in this pot is still short, but at least the morning glory figured it out. I've got quite a ways to go to get to my "wall of vines" look I was going for. *sigh* oh well.

We're looking to buy a house so hopefully this time next year, I'll own dirt that isn't contained in pots and my garden will be behaving a bit nicer.
Showing posts with label container gardening. Show all posts

Sunday, June 3, 2012

2012 Home Garden Update: May

I got a late start on my seeds this year so I'm not going to be able to grow as much from scratch as I had originally hoped.

This is my 2012 seed starting operation. I'm re-using single serve yogurt and food cups and colored craft sticks from my dollar store.

Two weeks later...

I'm working on filling in the front of my courtyard with white and purple sweet alyssum. I'm hoping it will fill in nicely and re-seed on its own so that I can have some low maintenance flowers. I'm also seed starting some candytuft, aubrietta and rockcress so that I have some true perennials there, too.

This rose bush came with my house and was cracked out on chemical applications and not very happy when we got here. Three years later, with some love, pruning and compost, it's so beautiful and happy. This is the first bloom of the season. I have lots of buds waiting to burst open, and I'm hoping to make rose petal vinegar and rose petal jelly.

The aphids have arrived a bit early this year. I bought a small package of live ladybugs and released them in my garden overnight. This is the first year I've used ladybugs and was surprised that since releasing them, I haven't found a single ladybug on my rosebush (where aphids tend to congregate) but I can almost always count on finding at least two hanging out on my lavender plant (which as far as I can tell is pretty pest free) at any given time.

My container strawberries are blooming. I followed my own advice on how to increase yield by plucking off the first flowers and berries of the year to get a better yield. They are re-generating large beautiful berries now and hopefully in my June update, I'll have ripe red strawberry pictures to share.


Saturday, June 2, 2012

Gardening Quick Tip: Strawberries

Oh, the first strawberry flowers of the season! I get so excited when I see them because sweet fresh berries are just around the corner.

What can you do to help increase your berry yield? It seems anti-intuitive: Pick off the first flowers and small berries.

See these? They seem so sweet. No, friends: they are the enemy.

If you leave these tiny flowers, your plant will make tiny berries. Pick off the first tiny berries and flowers and your plant will think it's under attack and respond by making even more and bigger berries....which means more strawberry shortcake for you. You're welcome.

Thursday, July 7, 2011

How Does Your Garden Grow?

This is the first year I've really gotten serious about doing a garden journal. I've been taking pictures of my garden in progress to put together into a photo book at the end of the season. I've also been labeling some of the photos with what kinds of seeds I used so I can keep track of which things are doing well.  The first one I did of my plants in May looks like this:


If you save your layers in photoshop and keep standing in about the same place, you can drop a new pictures in every so often and just make minor adjustments to make sure the arrows are still pointing at the right plants. I love watching the progress of how things are growing.


Here are some progress pics of my front planter (One pic for each month. Also, if you'll remember, it used to look like this!)


Friday, June 3, 2011

Our front yard: A Journey

2009
This is what our front yard looked like when we first moved in three years ago:

This was the inside of the courtyard, up against the house where we keep the main part of the garden:
not really much if you ask me. A few funky bushes (including some who did not fare the winter so well and turned into round balls of sticks)

Thursday, May 5, 2011

Funky Plant Markers (and mini-tutorial)

Silverware plant markers are by no means an original idea, but I sure love how they look!  I'm getting ready for a Spring Garden and Crafts fair on my family's farm next month and I've made a few of these both for my garden and for the fair.

I've got some "serious" ones for actually labeling plants:

And some fun ones that say more clever things:

Read the rest to check out how I made them:

Saturday, August 2, 2008

The tale of a confused tomato

As I showed in my last post, my upside-down tomato is a little confused about this growing in a hanging pot business and was doing this:

The very friendly people in the container gardeners group on Ravelry told me that as the fruit get bigger that the stalk will straighten out. Since the plant in the above picture already had 13 fruits on it, I thought it would gradually get pulled down as the fruit get bigger and heavier.

So went to work on Thursday with the plant looking exactly as it does in the above picture but when I came home it was doing this:

It almost completely straightened out over a 6 hour period!

But now that the stalks are growing down, the stems and the fruit (which had been growing parallel to the ground) are now growing sideways:


I hope the stems re-correct as well because I'm worried as the fruit gets bigger that gravity might start pulling it off the stem pre-maturely.

Tuesday, July 29, 2008

Garden pics

In non-knitting, non-cupcaking news, this is what I've been up to:

(apprehensive dog for scale)

I've been growing a mini-garden on my back porch.

I've got 2 tomato plants (one regular, one upside down), a basil plant, a very sad looking hydrangea, an avocado tree sproutling, and some morning glory/beans.

Tomato #1 is in the picture above. While it's very large and bushy, it has no tomatoes. It had quite a few flowers but they seem to be infertile. I'm curious to see if maybe it will get some later.


Tomato #2, I'm growing upside down.
I drilled a 1.5" hole in the bottom of a 5 gallon pot, put coffee filters around the hole so the dirt wouldn't fall out and threaded a (much smaller) tomato start through. It did okay like this for a while but then decided to rebel (red lines show how the stalks are growing):

It grew down for a bit but then did a u-turn up to the right. The fork to the left is actually just a really big branch coming off the main stalk. Both are growing in a decidedly upward fashion.

And while it's definitely an "interesting" looking plant, it was the first one to make one of these!
There are currently 13 tomatoes growing on the upside-down plant with many more pregnant-looking flowers that I'm sure will turn into tomatoes soon. :-)

The Vines are not cooperating. I had this vision...the bars on the side of the porch covered in beautiful vines sharing their bounty of morning glory flowers and green beans with me. I planted both morning glories and beans in smaller pots and spaced them out along the fence.


This pot didn't get the memo:
Since I took this picture last week, the beans have since flowered and are growing mini-beans....but they forgot to climb. They're just hanging out near the pot. The morning glories in this pot were trying to climb the beans so I tried to re-direct them to the rail and now thery are being grumpy at me.

This is the only pot of the 4 which is doing what it's supposed to:
The bean in this pot is still short, but at least the morning glory figured it out. I've got quite a ways to go to get to my "wall of vines" look I was going for. *sigh* oh well.

We're looking to buy a house so hopefully this time next year, I'll own dirt that isn't contained in pots and my garden will be behaving a bit nicer.

 
Design by Free WordPress Themes | Bloggerized by Lasantha - Premium Blogger Themes | Facebook Themes