Showing posts with label garden. Show all posts
Saturday, June 23, 2012
Broccoli Romanesco Parmisagna
I have a broccoli romanesco plant that overwintered in my garden and was starting to get ready to harvest last week. I ran into a challenge since I didn't realize it wasn't a "normal" broccoli plant until I was checking it out and saw it's pretty, bright green spikes.
I did some research and found out it is closer in taste to cauliflower than broccoli and needs a little extra love to make sure the texture turns out right. I sauteed it first with some garlic and steamed it before adding some parmesean. My two year old "helped" me cook and was SO excited to eat it when we were done. The grown ups liked it, too. In fact, I just ate a huge bowl of this (and just this) for dinner.
If you don't have a garden to grow your own, you can also get it at farmer's markets and natural food markets when it's in season, which won't be until the fall in most cases. But that's what Pinterest is for, right?
How to Make Broccoli Romanesco Parmisagna
Ingredients
1 head Broccoli Romanesco
Extra Virgin Olive Oil
2 cloves of garlic
1/2 cup grated parmesean cheese plus extra for garnish is desired.
Cook it up!
1. Wash the broccoli and cut the florets from main stalk
2. Heat some EVOO in a pan. Add two gloves or crushed or minced garlic and sautee for 1-2 minutes.
3. Add the broccoli and saute for approximately 5 minutes. Add 1 cup of water to the bottom of the pan and cover with a lid to allow broccoli to steam for approximately 10 minutes.
4. After 10 minutes, remove the lid and allow to cook uncovered for up to 4 more minutes to allow any remaining water to cook off.
5. Dust broccoli generously with grated parmesean cheese. Cover pan and turn off heat. Allow to sit for 2-3 minutes to allow the cheese to melt.
Serve it up with dinner and enjoy this tasty vegetable. My one head of home grown, organic, broccoli romanesco made enough for 2 generously sized adult sides and some snacking pieces for the toddler. Although I'll admit that I pretty much just ate a large bowl of it for dinner.
Saturday, June 2, 2012
Gardening Quick Tip: Strawberries
Oh, the first strawberry flowers of the season! I get so excited when I see them because sweet fresh berries are just around the corner.
What can you do to help increase your berry yield? It seems anti-intuitive: Pick off the first flowers and small berries.
See these? They seem so sweet. No, friends: they are the enemy.
If you leave these tiny flowers, your plant will make tiny berries. Pick off the first tiny berries and flowers and your plant will think it's under attack and respond by making even more and bigger berries....which means more strawberry shortcake for you. You're welcome.
What can you do to help increase your berry yield? It seems anti-intuitive: Pick off the first flowers and small berries.
See these? They seem so sweet. No, friends: they are the enemy.
If you leave these tiny flowers, your plant will make tiny berries. Pick off the first tiny berries and flowers and your plant will think it's under attack and respond by making even more and bigger berries....which means more strawberry shortcake for you. You're welcome.
Friday, June 3, 2011
Our front yard: A Journey
2009
This is what our front yard looked like when we first moved in three years ago:
This was the inside of the courtyard, up against the house where we keep the main part of the garden:
not really much if you ask me. A few funky bushes (including some who did not fare the winter so well and turned into round balls of sticks)
Thursday, May 5, 2011
Funky Plant Markers (and mini-tutorial)
Silverware plant markers are by no means an original idea, but I sure love how they look! I'm getting ready for a Spring Garden and Crafts fair on my family's farm next month and I've made a few of these both for my garden and for the fair.
I've got some "serious" ones for actually labeling plants:
And some fun ones that say more clever things:
Read the rest to check out how I made them:
Sunday, March 6, 2011
Countdown to Spring: More Great (and Thrifty!) Ideas
I love Spring for lots of reasons. I get to start my garden after a long cold winter, I get to swap out the red winter decor for some great green stuff, and Easter, the high Christian holiday. I found one great craft from each of these categories that I'm totally loving and thought I'd share for my fellow spring lovers.
For the Garden: Plantable Seedling Pots
While I love the idea of plantable seedling pots, I feel like they frequently don't work out because the bottoms usually decompose slower than the roots grow to the bottom of the pot and need more space. That's why I love these. You put paper towel tube pieces in a water proof tray and fill with dirt. There is no bottom so when it's time to plant you don't have to worry about cutting out the bottom or dealing with plants that don't have enough root space. While the twine is pragmatic (keeps the tube from unrolling when it's wet) it makes it look super cute. I found these over at Homework: Today's Assignment, Be Inspired.
For the Green: Split Pea Centerpiece
I love staggered height candle holders. These are easy to make, super cheap (way better than the $10+ for each piece you'd pay even at IKEA prices) and GREEN. Check out the tutorial over at Two Twenty One.
For Easter: Treasure Rocks
Cindy actually made these to be treasure "blarney stones" for St. Patrick's day. Which is cool if you celebrate St. Patty's (we're actually not big St. Patty's day people). Why I think these are AWESOME though, is because you could make them egg shaped and do these for Easter. If someone can't find an egg, you don't need to worry about it starting to smell or attracting animals. They are made with non toxic ingredients (can't say that about plastic eggs). AND smashing your eggs open with a hammer is a ba-zillion times cooler than opening plastic eggs (especially when you have a family full of little boys like we do). Check out Cindy's brilliant idea and tutorial over at Skip to My Lou.
Labels:
dollar store crafts,
easter,
garden,
green,
round up,
spring crafts,
spring decor,
thrifty
Saturday, August 2, 2008
The tale of a confused tomato
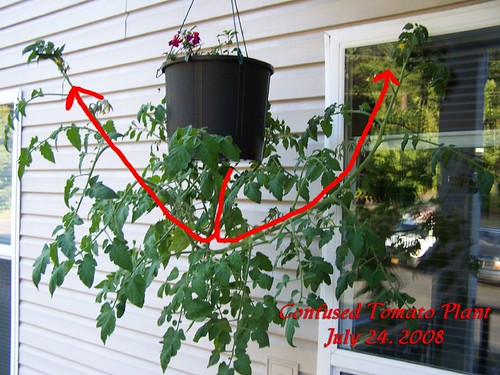
As I showed in my last post, my upside-down tomato is a little confused about this growing in a hanging pot business and was doing this:
The very friendly people in the container gardeners group on Ravelry told me that as the fruit get bigger that the stalk will straighten out. Since the plant in the above picture already had 13 fruits on it, I thought it would gradually get pulled down as the fruit get bigger and heavier.
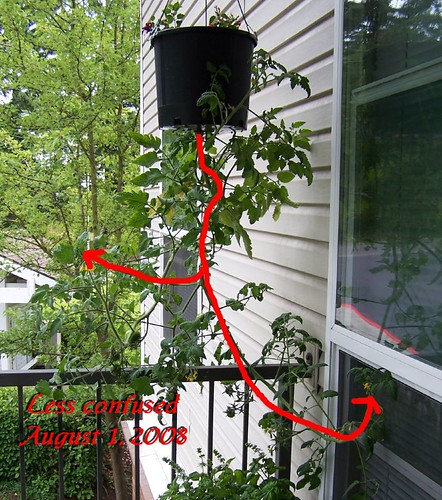
So went to work on Thursday with the plant looking exactly as it does in the above picture but when I came home it was doing this:
It almost completely straightened out over a 6 hour period!
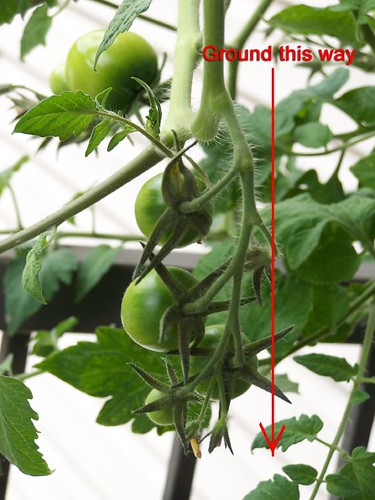
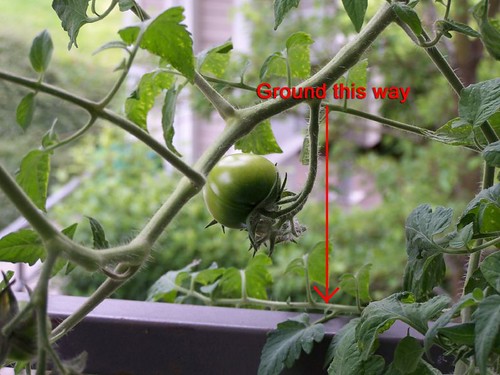
But now that the stalks are growing down, the stems and the fruit (which had been growing parallel to the ground) are now growing sideways:


I hope the stems re-correct as well because I'm worried as the fruit gets bigger that gravity might start pulling it off the stem pre-maturely.
The very friendly people in the container gardeners group on Ravelry told me that as the fruit get bigger that the stalk will straighten out. Since the plant in the above picture already had 13 fruits on it, I thought it would gradually get pulled down as the fruit get bigger and heavier.So went to work on Thursday with the plant looking exactly as it does in the above picture but when I came home it was doing this:
It almost completely straightened out over a 6 hour period!But now that the stalks are growing down, the stems and the fruit (which had been growing parallel to the ground) are now growing sideways:


I hope the stems re-correct as well because I'm worried as the fruit gets bigger that gravity might start pulling it off the stem pre-maturely.
Labels:
container gardening,
garden,
my garden,
upside down tomato
Tuesday, July 29, 2008
Garden pics
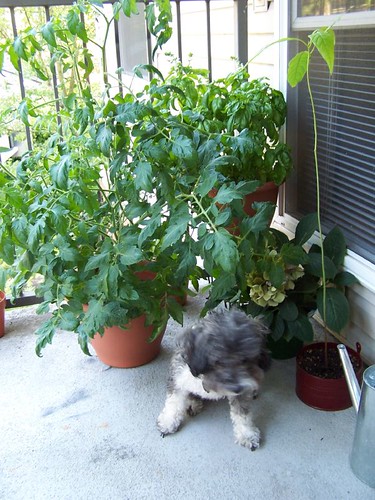
In non-knitting, non-cupcaking news, this is what I've been up to:
(apprehensive dog for scale)
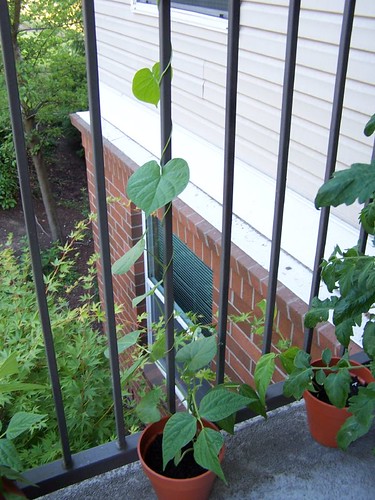
The Vines are not cooperating. I had this vision...the bars on the side of the porch covered in beautiful vines sharing their bounty of morning glory flowers and green beans with me. I planted both morning glories and beans in smaller pots and spaced them out along the fence.
This pot didn't get the memo:
Since I took this picture last week, the beans have since flowered and are growing mini-beans....but they forgot to climb. They're just hanging out near the pot. The morning glories in this pot were trying to climb the beans so I tried to re-direct them to the rail and now thery are being grumpy at me.
This is the only pot of the 4 which is doing what it's supposed to:
The bean in this pot is still short, but at least the morning glory figured it out. I've got quite a ways to go to get to my "wall of vines" look I was going for. *sigh* oh well.
We're looking to buy a house so hopefully this time next year, I'll own dirt that isn't contained in pots and my garden will be behaving a bit nicer.
(apprehensive dog for scale)I've been growing a mini-garden on my back porch.
I've got 2 tomato plants (one regular, one upside down), a basil plant, a very sad looking hydrangea, an avocado tree sproutling, and some morning glory/beans.
Tomato #1 is in the picture above. While it's very large and bushy, it has no tomatoes. It had quite a few flowers but they seem to be infertile. I'm curious to see if maybe it will get some later.
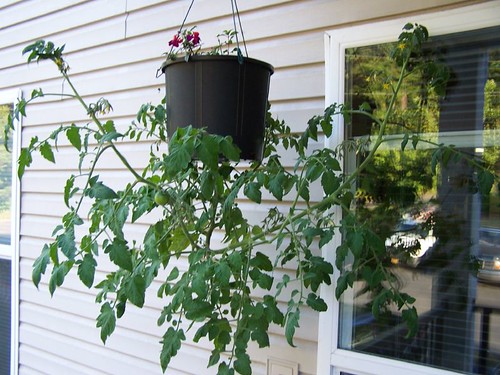
Tomato #2, I'm growing upside down.
I drilled a 1.5" hole in the bottom of a 5 gallon pot, put coffee filters around the hole so the dirt wouldn't fall out and threaded a (much smaller) tomato start through. It did okay like this for a while but then decided to rebel (red lines show how the stalks are growing):
It grew down for a bit but then did a u-turn up to the right. The fork to the left is actually just a really big branch coming off the main stalk. Both are growing in a decidedly upward fashion.
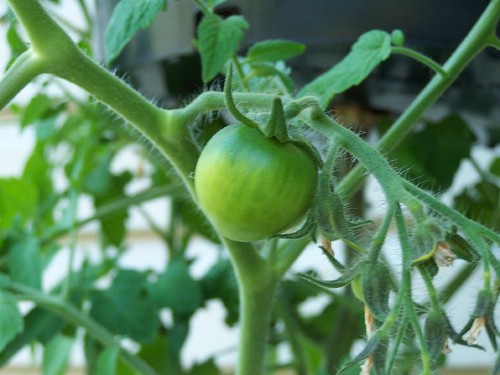
And while it's definitely an "interesting" looking plant, it was the first one to make one of these!
There are currently 13 tomatoes growing on the upside-down plant with many more pregnant-looking flowers that I'm sure will turn into tomatoes soon. :-)
I've got 2 tomato plants (one regular, one upside down), a basil plant, a very sad looking hydrangea, an avocado tree sproutling, and some morning glory/beans.
Tomato #1 is in the picture above. While it's very large and bushy, it has no tomatoes. It had quite a few flowers but they seem to be infertile. I'm curious to see if maybe it will get some later.
Tomato #2, I'm growing upside down.
I drilled a 1.5" hole in the bottom of a 5 gallon pot, put coffee filters around the hole so the dirt wouldn't fall out and threaded a (much smaller) tomato start through. It did okay like this for a while but then decided to rebel (red lines show how the stalks are growing):
It grew down for a bit but then did a u-turn up to the right. The fork to the left is actually just a really big branch coming off the main stalk. Both are growing in a decidedly upward fashion.And while it's definitely an "interesting" looking plant, it was the first one to make one of these!
There are currently 13 tomatoes growing on the upside-down plant with many more pregnant-looking flowers that I'm sure will turn into tomatoes soon. :-)This pot didn't get the memo:
Since I took this picture last week, the beans have since flowered and are growing mini-beans....but they forgot to climb. They're just hanging out near the pot. The morning glories in this pot were trying to climb the beans so I tried to re-direct them to the rail and now thery are being grumpy at me.This is the only pot of the 4 which is doing what it's supposed to:
The bean in this pot is still short, but at least the morning glory figured it out. I've got quite a ways to go to get to my "wall of vines" look I was going for. *sigh* oh well.We're looking to buy a house so hopefully this time next year, I'll own dirt that isn't contained in pots and my garden will be behaving a bit nicer.
Labels:
beans,
container gardening,
garden,
morning glories,
my garden,
upside down tomato
Subscribe to:
Posts (Atom)
Showing posts with label garden. Show all posts
Saturday, June 23, 2012
Broccoli Romanesco Parmisagna
I have a broccoli romanesco plant that overwintered in my garden and was starting to get ready to harvest last week. I ran into a challenge since I didn't realize it wasn't a "normal" broccoli plant until I was checking it out and saw it's pretty, bright green spikes.
I did some research and found out it is closer in taste to cauliflower than broccoli and needs a little extra love to make sure the texture turns out right. I sauteed it first with some garlic and steamed it before adding some parmesean. My two year old "helped" me cook and was SO excited to eat it when we were done. The grown ups liked it, too. In fact, I just ate a huge bowl of this (and just this) for dinner.
If you don't have a garden to grow your own, you can also get it at farmer's markets and natural food markets when it's in season, which won't be until the fall in most cases. But that's what Pinterest is for, right?
How to Make Broccoli Romanesco Parmisagna
Ingredients
1 head Broccoli Romanesco
Extra Virgin Olive Oil
2 cloves of garlic
1/2 cup grated parmesean cheese plus extra for garnish is desired.
Cook it up!
1. Wash the broccoli and cut the florets from main stalk
2. Heat some EVOO in a pan. Add two gloves or crushed or minced garlic and sautee for 1-2 minutes.
3. Add the broccoli and saute for approximately 5 minutes. Add 1 cup of water to the bottom of the pan and cover with a lid to allow broccoli to steam for approximately 10 minutes.
4. After 10 minutes, remove the lid and allow to cook uncovered for up to 4 more minutes to allow any remaining water to cook off.
5. Dust broccoli generously with grated parmesean cheese. Cover pan and turn off heat. Allow to sit for 2-3 minutes to allow the cheese to melt.
Serve it up with dinner and enjoy this tasty vegetable. My one head of home grown, organic, broccoli romanesco made enough for 2 generously sized adult sides and some snacking pieces for the toddler. Although I'll admit that I pretty much just ate a large bowl of it for dinner.
Saturday, June 2, 2012
Gardening Quick Tip: Strawberries
Oh, the first strawberry flowers of the season! I get so excited when I see them because sweet fresh berries are just around the corner.
What can you do to help increase your berry yield? It seems anti-intuitive: Pick off the first flowers and small berries.
See these? They seem so sweet. No, friends: they are the enemy.
If you leave these tiny flowers, your plant will make tiny berries. Pick off the first tiny berries and flowers and your plant will think it's under attack and respond by making even more and bigger berries....which means more strawberry shortcake for you. You're welcome.
What can you do to help increase your berry yield? It seems anti-intuitive: Pick off the first flowers and small berries.
See these? They seem so sweet. No, friends: they are the enemy.
If you leave these tiny flowers, your plant will make tiny berries. Pick off the first tiny berries and flowers and your plant will think it's under attack and respond by making even more and bigger berries....which means more strawberry shortcake for you. You're welcome.
Friday, June 3, 2011
Our front yard: A Journey
2009
This is what our front yard looked like when we first moved in three years ago:
This was the inside of the courtyard, up against the house where we keep the main part of the garden:
not really much if you ask me. A few funky bushes (including some who did not fare the winter so well and turned into round balls of sticks)
Thursday, May 5, 2011
Funky Plant Markers (and mini-tutorial)
Silverware plant markers are by no means an original idea, but I sure love how they look! I'm getting ready for a Spring Garden and Crafts fair on my family's farm next month and I've made a few of these both for my garden and for the fair.
I've got some "serious" ones for actually labeling plants:
And some fun ones that say more clever things:
Read the rest to check out how I made them:
Sunday, March 6, 2011
Countdown to Spring: More Great (and Thrifty!) Ideas
I love Spring for lots of reasons. I get to start my garden after a long cold winter, I get to swap out the red winter decor for some great green stuff, and Easter, the high Christian holiday. I found one great craft from each of these categories that I'm totally loving and thought I'd share for my fellow spring lovers.
For the Garden: Plantable Seedling Pots
While I love the idea of plantable seedling pots, I feel like they frequently don't work out because the bottoms usually decompose slower than the roots grow to the bottom of the pot and need more space. That's why I love these. You put paper towel tube pieces in a water proof tray and fill with dirt. There is no bottom so when it's time to plant you don't have to worry about cutting out the bottom or dealing with plants that don't have enough root space. While the twine is pragmatic (keeps the tube from unrolling when it's wet) it makes it look super cute. I found these over at Homework: Today's Assignment, Be Inspired.
For the Green: Split Pea Centerpiece
I love staggered height candle holders. These are easy to make, super cheap (way better than the $10+ for each piece you'd pay even at IKEA prices) and GREEN. Check out the tutorial over at Two Twenty One.
For Easter: Treasure Rocks
Cindy actually made these to be treasure "blarney stones" for St. Patrick's day. Which is cool if you celebrate St. Patty's (we're actually not big St. Patty's day people). Why I think these are AWESOME though, is because you could make them egg shaped and do these for Easter. If someone can't find an egg, you don't need to worry about it starting to smell or attracting animals. They are made with non toxic ingredients (can't say that about plastic eggs). AND smashing your eggs open with a hammer is a ba-zillion times cooler than opening plastic eggs (especially when you have a family full of little boys like we do). Check out Cindy's brilliant idea and tutorial over at Skip to My Lou.
Saturday, August 2, 2008
The tale of a confused tomato
As I showed in my last post, my upside-down tomato is a little confused about this growing in a hanging pot business and was doing this:
The very friendly people in the container gardeners group on Ravelry told me that as the fruit get bigger that the stalk will straighten out. Since the plant in the above picture already had 13 fruits on it, I thought it would gradually get pulled down as the fruit get bigger and heavier.
So went to work on Thursday with the plant looking exactly as it does in the above picture but when I came home it was doing this:
It almost completely straightened out over a 6 hour period!
But now that the stalks are growing down, the stems and the fruit (which had been growing parallel to the ground) are now growing sideways:


I hope the stems re-correct as well because I'm worried as the fruit gets bigger that gravity might start pulling it off the stem pre-maturely.
The very friendly people in the container gardeners group on Ravelry told me that as the fruit get bigger that the stalk will straighten out. Since the plant in the above picture already had 13 fruits on it, I thought it would gradually get pulled down as the fruit get bigger and heavier.So went to work on Thursday with the plant looking exactly as it does in the above picture but when I came home it was doing this:
It almost completely straightened out over a 6 hour period!But now that the stalks are growing down, the stems and the fruit (which had been growing parallel to the ground) are now growing sideways:


I hope the stems re-correct as well because I'm worried as the fruit gets bigger that gravity might start pulling it off the stem pre-maturely.
Tuesday, July 29, 2008
Garden pics
In non-knitting, non-cupcaking news, this is what I've been up to:
(apprehensive dog for scale)
The Vines are not cooperating. I had this vision...the bars on the side of the porch covered in beautiful vines sharing their bounty of morning glory flowers and green beans with me. I planted both morning glories and beans in smaller pots and spaced them out along the fence.
This pot didn't get the memo:
Since I took this picture last week, the beans have since flowered and are growing mini-beans....but they forgot to climb. They're just hanging out near the pot. The morning glories in this pot were trying to climb the beans so I tried to re-direct them to the rail and now thery are being grumpy at me.
This is the only pot of the 4 which is doing what it's supposed to:
The bean in this pot is still short, but at least the morning glory figured it out. I've got quite a ways to go to get to my "wall of vines" look I was going for. *sigh* oh well.
We're looking to buy a house so hopefully this time next year, I'll own dirt that isn't contained in pots and my garden will be behaving a bit nicer.
(apprehensive dog for scale)I've been growing a mini-garden on my back porch.
I've got 2 tomato plants (one regular, one upside down), a basil plant, a very sad looking hydrangea, an avocado tree sproutling, and some morning glory/beans.
Tomato #1 is in the picture above. While it's very large and bushy, it has no tomatoes. It had quite a few flowers but they seem to be infertile. I'm curious to see if maybe it will get some later.
Tomato #2, I'm growing upside down.
I drilled a 1.5" hole in the bottom of a 5 gallon pot, put coffee filters around the hole so the dirt wouldn't fall out and threaded a (much smaller) tomato start through. It did okay like this for a while but then decided to rebel (red lines show how the stalks are growing):
It grew down for a bit but then did a u-turn up to the right. The fork to the left is actually just a really big branch coming off the main stalk. Both are growing in a decidedly upward fashion.
And while it's definitely an "interesting" looking plant, it was the first one to make one of these!
There are currently 13 tomatoes growing on the upside-down plant with many more pregnant-looking flowers that I'm sure will turn into tomatoes soon. :-)
I've got 2 tomato plants (one regular, one upside down), a basil plant, a very sad looking hydrangea, an avocado tree sproutling, and some morning glory/beans.
Tomato #1 is in the picture above. While it's very large and bushy, it has no tomatoes. It had quite a few flowers but they seem to be infertile. I'm curious to see if maybe it will get some later.
Tomato #2, I'm growing upside down.
I drilled a 1.5" hole in the bottom of a 5 gallon pot, put coffee filters around the hole so the dirt wouldn't fall out and threaded a (much smaller) tomato start through. It did okay like this for a while but then decided to rebel (red lines show how the stalks are growing):
It grew down for a bit but then did a u-turn up to the right. The fork to the left is actually just a really big branch coming off the main stalk. Both are growing in a decidedly upward fashion.And while it's definitely an "interesting" looking plant, it was the first one to make one of these!
There are currently 13 tomatoes growing on the upside-down plant with many more pregnant-looking flowers that I'm sure will turn into tomatoes soon. :-)This pot didn't get the memo:
Since I took this picture last week, the beans have since flowered and are growing mini-beans....but they forgot to climb. They're just hanging out near the pot. The morning glories in this pot were trying to climb the beans so I tried to re-direct them to the rail and now thery are being grumpy at me.This is the only pot of the 4 which is doing what it's supposed to:
The bean in this pot is still short, but at least the morning glory figured it out. I've got quite a ways to go to get to my "wall of vines" look I was going for. *sigh* oh well.We're looking to buy a house so hopefully this time next year, I'll own dirt that isn't contained in pots and my garden will be behaving a bit nicer.
Subscribe to:
Posts (Atom)