Showing posts with label fall. Show all posts

Monday, October 15, 2012

Pumpkin Cake and Recipe

I have a confession.

I'm not a huge Halloween fan.

I know. I feel like I just uttered the words that might make the craft blogger police come knocking.

But honestly? I can totally live without the creepy, scary, gross you out stuff that's become popular. I don't like to be scared. Or grossed out. I like my food to look like, well, food - not witch fingers or worms. Is that so wrong?

But I still love Autumn. And one of the number one reasons is pumpkins. I looooooovvvveeee pumpkins! So much cuter and family friendly than a zombie brain don't you think? So if I show up at your party with a pumpkin cake instead of something looking like it had a bad run-in with the undead, I hope you'll still be my friend.

I made this cake for a Halloween party last year and it was deceptively easy. And also nutritious (it has 2 cups of pumpkin in the mix!).  Here's how I did it:


Pumpkin Spice Chocolate Pumpkin Cake

Ingredients:
Cake
  • 1 box chocolate cake mix
  • 2 cups fresh pumpkin puree*
  • 2 tsp cinnamon
  • 1 tsp ground cloves
  • 1 tsp ground all spice
  • 1/2 tsp ground cloves
  • 1/4 tsp ground ginger
  • 3 eggs (or however many called for on the box)
  • 1 Tbsp organic canola oil
Decorations
  • 3 green "Airheads" candys (for stem)
  • 1 container prepared frosting, colored orange (Sur la Table is one place you can get Natural Decorating Colors if you're avoiding synthetic food dyes)
*I used the technique I taught here to make my fresh pumpkin puree (it's actually really easy). If you don't have afresh pumpkin on hand to puree, use a 14 ounce can of pumpkin instead.

Extras Needed:
Directions:
  1. Pre-heat oven to 325°F. Prepare tall glass bowl for baking by greasing and flouring it. Set aside.
  2. Combine all cake ingredients using a hand mixer. Pour into prepared bowl. 
  3. Bake for about 1 hour, 10 minutes or until a wooden skewer inserted in center comes out clean. Run knife around edge of bowl and turn out onto a cooling rack. Allow to cool at least two hours or until completely cool to the touch
  4. Decorate cake by frosting with the orange frosting. Use up and down strokes to simulate pumpkin ridges with the frosting
  5. Make the stem and leaf by putting airheads in a glass bowl and microwaving in 5 second intervals until pliable. (Be careful not to heat it too hot or it may stick to and burn your skin!) Mold candy like playdough to make a stem and leaf shape. Lay over top of cake.

I'm sharing this with:
* Get your Craft on at: Today's Creative Blog*


(links to products within this post are my affiliate links and I may receive a portion of any sales resulting from your click. I promise to only link to products I personally recommend. Thank you for supporting Carissa's Creativity Space) 

Wednesday, October 10, 2012

Easy Burlap Candle Holder (or vase)

I love decorating for fall. Pulling out the pumpkins, candles and leaves each year makes me so happy. If you're looking for some new decor but don't have the budget, you could do this project for FREE with things you have around your house. And if you don't happen to have everything, you can pick these supplies up at your local dollar store or thrift store.


Supplies Needed:

  • Two glass cups or candle holders (one needs to be small enough to fit inside the other)
  • Burlap scraps. Cut yours into strips if they aren't already.
  • Candle - fake or otherwise


Three Super Easy Steps:

Step 1: Insert small cup


Step 2: Add burlap in the gap


Step 3: Add a candle
or add water and flowers:

That's it! Now sit back and be impressed with your frugal fall crafting self.

This project was featured on Thrifty 101

I'm also sharing this project with...

Saturday, November 19, 2011

A Few of My Favorite Things: Thanksgiving

Now that Halloween is over, there is only one thing standing in the way of me and Christmas: Thanksgiving.  That and about 36 days. Don't get me wrong: I love Thanksgiving. I love food and fall colors and family...what's not to love?

These are some of my favorite things from around the internet that may inspire you to make your Thanksgiving even more fabulous.

Fabulous Food

Cinnamon Roll Pie Crust by Taste for Adventure
This pie crust was originally designed to be used to make a sweet potato pie. I'll be honest: I don't like sweet potato pie. Or sweet potato anything, really. But you know what I do love? Cinnamon rolls. And this pie crust idea blows. my. mind. Use this great tutorial to make an amazing pie crust for what ever kind of pie you fancy.


Bacon Wrapped Green Beans by Just Cook Already
Nobody will want to eat Aunt Mildred's green bean casserole once you wow your family with this super tasty (and vegiphobic family member friendly) green bean dish. Sign up to bring the veggie dish and you may even steal the show from the turkey.


Turkey Cake Pops from Bakerella
A fun alternative to pie for the kids or the pie-adverse (or something to bring just because they are super fun!). I heard a rumor my brother's girlfriend is going to be making these for our family for Thanksgiving. Sounds like sister-in-law material to me! Don't worry, Chantal. I don't just love you for your cake pops.


Divine Decor

Stacked Pumpkins in Skinny Vases from FallWeddings.com
I love the look of fun things filling vases. Their different sizes and lopsidedness makes them more fun and whimsical just simply filling vases or bowls with nuts or cranberries.


5 Minute Autumn Centerpiece from SAS Interiors
Facebook fans will recognize this project from SAS Interiors that I linked to last month. It's so simple, beautiful and easy that I just had to spotlight it here, too!  Jenna's great tutorial walks you right through how to make this easy but impressive looking centerpiece.


THANKS Glasses from Naptime Decorator
If you have more than five minutes, check out this beautiful mantle decoration that Liz from Naptime Decorator made from Dollar Store materials. This would look great along the back of a buffet table, on a bar, the top of your china cabinet...or pretty much anywhere!  Liz walks you through how she made it with great pictures on her blog.

~ ~ ~ ~ ~ ~
I hope you found a little bit of inspiration for how to make your Thanksgiving even more special this year. If I featured your project, thank you for sharing your creativity with the blog community. Please feel free to grab a button!

Carissa's Creativity Space
<a href="http://creativecarissa.blogspot.com" target="_blank"><img src="https://blogger.googleusercontent.com/img/b/R29vZ2xl/AVvXsEiklZr_Hri2zrZPhH-zN8NNyq6pEdZTgy-Rcud5hiRQiD_geRrQiXRwXiydjUqfA42RYEjke7JoQA2_vGlVBh3g7GadFxK3q2nnFZ0yC5AEv86c3o5l36hOBeqz164TxXzugVmQDxje50I/s150/featured%252520button%252520150%252520px%252520copy.jpg" alt="Carissa's Creativity Space" width="125" height="125" /></a>

Monday, October 24, 2011

Fall Wreath Round Up

I love me some fall decor! And while I love seasonal decor, I'm also lazy. I want to decorate for fall but I don't want to have to swap out my fall decor until I'm ready to put up my Christmas stuff. Which means I like fall decor that is generic enough to last from September through the end of November - not anything too Halloween or Thanksgiving specific.

I showed you my current fall wreath a couple weeks ago but wanted to share a few of my other favorite fall wreaths from around the internet for your crafting (and in one case, purchasing) enjoyment...


Autumn Wreath from In His Grip
Judy from In His Grip crafted this fabulous fall wreath using burlap strips, jute twine and other scrappy embellishments. She shows you step-by-step what she did so you can make your own fabulously rustic looking monogram wreath for your door, too.

Ombre Effect Wreath on Every Creative Endeavor
Bev from Flamingo Toes shares a guest post over at Every Creative Endeavor for how to make this beautiful ombre rosette wreath. It's a complete tutorial including how to make the fabric rosettes and how to print on fabric (it's surprisingly easy) to make the cute little bunting.

$10 Fall Wreath from Shanty 2 Chic
Whitney from Shanty 2 Chic is due to have a baby any day now but it hasn't stopped her from crafting up a storm. This cute wreath is made from Hobby Lobby finds and looks super high end but cost less than $10! Love that! Go check out her tutorial and wish her luck with her new little bundle of baby.

Mossy Pumpkin Wreath from Etsy Seller TwoInspireYou
Want a super cute wreath but you're out of time with the Halloween frenzy coming up next week? Pop over to Etsy seller TwoInspireYou's shop and pick up this cute mossy wreath with little pumpkin accents and burlap ribbon hanger. Adorable!

I hope you guys enjoyed my fall wreath round up! If you love wreaths like I do, I'm always adding more to my wreath board over on Pinterest. Also.....if you were featured, please feel free to grab a button!


Carissa's Creativity Space
<a href="http://creativecarissa.blogspot.com" target="_blank"><img src="https://blogger.googleusercontent.com/img/b/R29vZ2xl/AVvXsEgChaYBjBvga5LJSOS7oeR72Ad1zcG7vjVtkoUNXp92XeDZBzizwZKv32LA7xXT4YekpsYYya1-yapcqIYo_9zqwA_Fnt6_NHuvG1Dawu3Qzpyu1iUaMJTShsc_3yD3r3zDcCo_nGHJcjg/s200/featured%252520button%252520200px%252520copy.jpg" alt="Carissa's Creativity Space" width="125" height="125" /></a>

Thursday, October 13, 2011

Easy Fall Wreath

I love Autumn. The gardener in me is a little sad that it's time to put my garden to bed for the winter (minus the   limited fall gardening I do). The crafter in me gets excited because now I can spend my gardening time doing fun fall and winter crafts.  Of course Fall has not officially begun until I hang a seasonal fall wreath on my door. So today I'm happy to announce...
Fall is Officially Here!


Thursday, October 6, 2011

How to Make Baby Cinnamon Rolls

Yesterday I told you about getting to meet Heather from Dollar Store Crafts at the premiere party for her new show, Get a Little Creative. And as you all know....a party isn't a party without great food!  The night before the party, I was stressing a little about what to bring because I needed to bring something either awesomely creative or super tasty....but I had no time to invest in making something awe-inspiring. I didn't have time to run to the store, either, which meant I needed to come up with something great using items I already had on hand. A tall order!

I remembered I had a roll of low fat crescent roll dough in the fridge and with some pantry staples figured I could gussy them up a bit to make something. A little of this and a little of that and these babies were born. And boy were they awesome!  They turned out even better than I had hoped. Plus they were easy and quick to make. I'm sure they will be making appearances at future potlucks and fall food events this year!


Monday, October 18, 2010

Fall Crafting

I'm such a bad blogger! I didn't realize how bad this blog has been neglected. In part because I've been blogging a bit...just not here. If you haven't checked it out yet, come visit my new blog: Not Really a Hippie which focuses more on parenting and family stuff. It's super new (I think I only have 3 posts) but will hopefully give me some space to write about mom stuff but leave this space free to talk about crafty things.

This fall I've been tackling some sewing projects. My mom is an A-mazing seamstress and has made all kind of fancy and beautiful dresses and projects. I sew mostly straight lines. BUT I have recently tackled some more advance projects. Wait. Who am I kidding? They are actually pretty non-advanced. They just involve some non-straight lines so I like to pretend. Ha!

Project #1: Baby Slings
I got an e-mail from a company I had previously bought a nursing cover from for a free baby sling on their new baby sling site. I've been wanting a baby sling so was more than thrilled to pay $12 shipping + handling to get a "free" sling. Bad news was that they didn't have any larger/taller sizes in and wouldn't until late November. Lame.

So...I got adventurous. I found a great tutorial on My Karma Baby about how to make a sling that looked simple enough. And even if I failed, I only lost 2 yards of fabric, right? I bought 2 yards of brown linen at Jo-Anns for about $8 and began.

Here's Joe wearing our son in his halloween costume (more on that in a minute):

The sling is a smidge big (I measured to the middle of my hip instead of the top of my hip) so we have to twist it to make it fit right when wearing him on our hip (Joe and I conveniently have the same shoulder-to-hip measurement).

I've since made 2 more: Once for my cousin Connie and her daughter and another for me that fits better. I just realized I don't really have good pictures of those, so I'll need to take some to put up later.


Project #2: Yoda Costume
We're on a tight Halloween budge this year, so we are making costumes. We already had some yoda feet socks (they are actually dinosaur socks) and brown clothes. We just needed a robe and a yoda hat.

The robe was pretty easy...fold a piece of cream flannel (1 yard on sale for $1.99) in half. Lay baby on the flannel, lining up shoulders with the fold. Trace around baby, leaving 2 inches or so of ease for the top and flaring out to a dress/robe shape at the bottom. Cut out around outline, adding additonal half-circle cut for neck and cutting a log slit of the front to make the robe. Hem sleeves and bottom. Sew 2 from cuff-to-bottom seams. Sew 1 inch strip folded in half all around robe opening to make a collar-type thing. Iron. Done.

For the hat, I traced around the outline of a hat he already has that fits well onto a paper bag to make a pattern. I used a 1/2 yard piece of green fleece to cut out the hat and make some big yoda ears to attach to the sides. Added some forehead wrinkles. Wha-la! Yoda costume for about $5.

EDITED TO ADD: In fact, I'm linking my yoda costume up over at the CSI project for their "$5 or less" project week
Visit thecsiproject.com


Project #3: Baby Pumpkin Hats
The third thing I did was make matching baby pumpkin hats for the babies coming to our family's annual fall party. I just realized I am short on pictures (and this post is getting pretty long as it is) so this will be a topic of a future post. If I get organized I might even be able to make a tutorial!

Here's a preview:


Better pics (and tutorial?) to come soon!

Monday, October 27, 2008

Fall is here

Part of why I have been such a blog slacker lately is because I get guilt for neglecting it.  I feel like I neglected my blog for so long that my next post better be awesome.  But I don't have anything awesome to post about so I don't post anything.  But then I feel guilty for not posting.  So then I feel like my next post needs to be awesome..... and it goes on and on.

So I'm giving up on trying to come up with witty, well-written, clever entries about the happenings of a knitting cupcaker and her family.  Instead, I think we're going to try the "short and sweet" approach.

So this is what I've got for today as a recap for October:

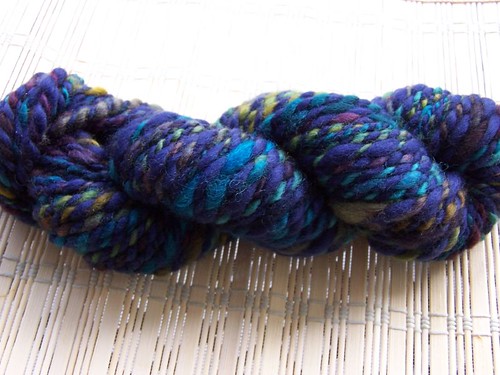
I made this yarn:

It's half fleece artist BFL and half purple corriedale.  In the end, it give me 98 g (about 64 yards) of bulky weight yarn.  I want to do mittens but I don't know if I have enough.


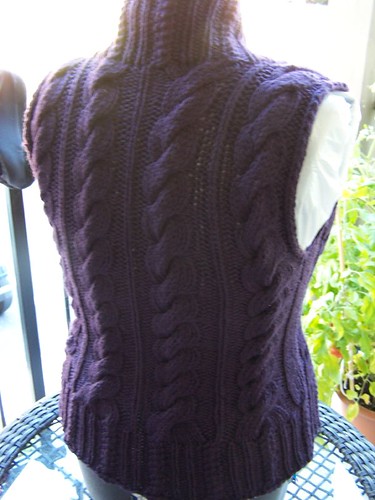
I made most of a sweater:
It's a modified version of Star-Cross'd Love.  Pattern was originally a size small, I'm making it a L/XL.  Looks good so far.  Need some sleeves and to add a bit of length to the collar.  If you're a Raveler, my pattern page lives here.


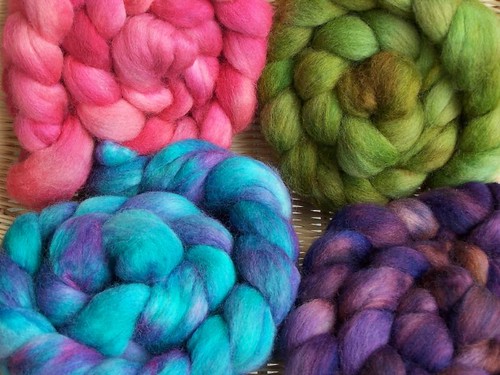
I dyed some new roving for my shop:

It's a new Cupcake Factory line called "Confection" and it lives here


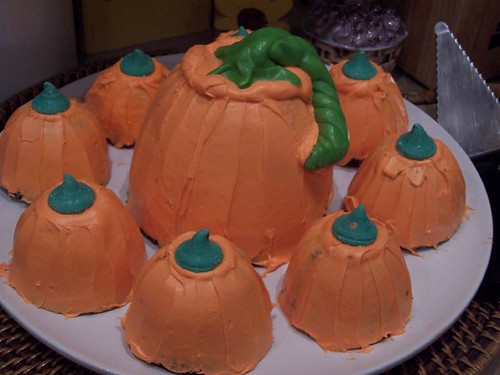
I made these:
The little ones are chocolate cakes baked in Pampered Chef prep bowls.  The big ones is yellow cake w/ halloween sprinkles (funfetti-syle) and baked in a PC small batter bowl.  Little stems are mint candies.  Large stem is molded lime tootsie rolls.


I went here:

And did this:


Oh!  And because Melody asked so nice, here is a gratuitous dog picture:


Showing posts with label fall. Show all posts

Monday, October 15, 2012

Pumpkin Cake and Recipe

I have a confession.

I'm not a huge Halloween fan.

I know. I feel like I just uttered the words that might make the craft blogger police come knocking.

But honestly? I can totally live without the creepy, scary, gross you out stuff that's become popular. I don't like to be scared. Or grossed out. I like my food to look like, well, food - not witch fingers or worms. Is that so wrong?

But I still love Autumn. And one of the number one reasons is pumpkins. I looooooovvvveeee pumpkins! So much cuter and family friendly than a zombie brain don't you think? So if I show up at your party with a pumpkin cake instead of something looking like it had a bad run-in with the undead, I hope you'll still be my friend.

I made this cake for a Halloween party last year and it was deceptively easy. And also nutritious (it has 2 cups of pumpkin in the mix!).  Here's how I did it:


Pumpkin Spice Chocolate Pumpkin Cake

Ingredients:
Cake
  • 1 box chocolate cake mix
  • 2 cups fresh pumpkin puree*
  • 2 tsp cinnamon
  • 1 tsp ground cloves
  • 1 tsp ground all spice
  • 1/2 tsp ground cloves
  • 1/4 tsp ground ginger
  • 3 eggs (or however many called for on the box)
  • 1 Tbsp organic canola oil
Decorations
  • 3 green "Airheads" candys (for stem)
  • 1 container prepared frosting, colored orange (Sur la Table is one place you can get Natural Decorating Colors if you're avoiding synthetic food dyes)
*I used the technique I taught here to make my fresh pumpkin puree (it's actually really easy). If you don't have afresh pumpkin on hand to puree, use a 14 ounce can of pumpkin instead.

Extras Needed:
Directions:
  1. Pre-heat oven to 325°F. Prepare tall glass bowl for baking by greasing and flouring it. Set aside.
  2. Combine all cake ingredients using a hand mixer. Pour into prepared bowl. 
  3. Bake for about 1 hour, 10 minutes or until a wooden skewer inserted in center comes out clean. Run knife around edge of bowl and turn out onto a cooling rack. Allow to cool at least two hours or until completely cool to the touch
  4. Decorate cake by frosting with the orange frosting. Use up and down strokes to simulate pumpkin ridges with the frosting
  5. Make the stem and leaf by putting airheads in a glass bowl and microwaving in 5 second intervals until pliable. (Be careful not to heat it too hot or it may stick to and burn your skin!) Mold candy like playdough to make a stem and leaf shape. Lay over top of cake.

I'm sharing this with:
* Get your Craft on at: Today's Creative Blog*


(links to products within this post are my affiliate links and I may receive a portion of any sales resulting from your click. I promise to only link to products I personally recommend. Thank you for supporting Carissa's Creativity Space) 

Wednesday, October 10, 2012

Easy Burlap Candle Holder (or vase)

I love decorating for fall. Pulling out the pumpkins, candles and leaves each year makes me so happy. If you're looking for some new decor but don't have the budget, you could do this project for FREE with things you have around your house. And if you don't happen to have everything, you can pick these supplies up at your local dollar store or thrift store.


Supplies Needed:

  • Two glass cups or candle holders (one needs to be small enough to fit inside the other)
  • Burlap scraps. Cut yours into strips if they aren't already.
  • Candle - fake or otherwise


Three Super Easy Steps:

Step 1: Insert small cup


Step 2: Add burlap in the gap


Step 3: Add a candle
or add water and flowers:

That's it! Now sit back and be impressed with your frugal fall crafting self.

This project was featured on Thrifty 101

I'm also sharing this project with...

Saturday, November 19, 2011

A Few of My Favorite Things: Thanksgiving

Now that Halloween is over, there is only one thing standing in the way of me and Christmas: Thanksgiving.  That and about 36 days. Don't get me wrong: I love Thanksgiving. I love food and fall colors and family...what's not to love?

These are some of my favorite things from around the internet that may inspire you to make your Thanksgiving even more fabulous.

Fabulous Food

Cinnamon Roll Pie Crust by Taste for Adventure
This pie crust was originally designed to be used to make a sweet potato pie. I'll be honest: I don't like sweet potato pie. Or sweet potato anything, really. But you know what I do love? Cinnamon rolls. And this pie crust idea blows. my. mind. Use this great tutorial to make an amazing pie crust for what ever kind of pie you fancy.


Bacon Wrapped Green Beans by Just Cook Already
Nobody will want to eat Aunt Mildred's green bean casserole once you wow your family with this super tasty (and vegiphobic family member friendly) green bean dish. Sign up to bring the veggie dish and you may even steal the show from the turkey.


Turkey Cake Pops from Bakerella
A fun alternative to pie for the kids or the pie-adverse (or something to bring just because they are super fun!). I heard a rumor my brother's girlfriend is going to be making these for our family for Thanksgiving. Sounds like sister-in-law material to me! Don't worry, Chantal. I don't just love you for your cake pops.


Divine Decor

Stacked Pumpkins in Skinny Vases from FallWeddings.com
I love the look of fun things filling vases. Their different sizes and lopsidedness makes them more fun and whimsical just simply filling vases or bowls with nuts or cranberries.


5 Minute Autumn Centerpiece from SAS Interiors
Facebook fans will recognize this project from SAS Interiors that I linked to last month. It's so simple, beautiful and easy that I just had to spotlight it here, too!  Jenna's great tutorial walks you right through how to make this easy but impressive looking centerpiece.


THANKS Glasses from Naptime Decorator
If you have more than five minutes, check out this beautiful mantle decoration that Liz from Naptime Decorator made from Dollar Store materials. This would look great along the back of a buffet table, on a bar, the top of your china cabinet...or pretty much anywhere!  Liz walks you through how she made it with great pictures on her blog.

~ ~ ~ ~ ~ ~
I hope you found a little bit of inspiration for how to make your Thanksgiving even more special this year. If I featured your project, thank you for sharing your creativity with the blog community. Please feel free to grab a button!

Carissa's Creativity Space
<a href="http://creativecarissa.blogspot.com" target="_blank"><img src="https://blogger.googleusercontent.com/img/b/R29vZ2xl/AVvXsEiklZr_Hri2zrZPhH-zN8NNyq6pEdZTgy-Rcud5hiRQiD_geRrQiXRwXiydjUqfA42RYEjke7JoQA2_vGlVBh3g7GadFxK3q2nnFZ0yC5AEv86c3o5l36hOBeqz164TxXzugVmQDxje50I/s150/featured%252520button%252520150%252520px%252520copy.jpg" alt="Carissa's Creativity Space" width="125" height="125" /></a>

Monday, October 24, 2011

Fall Wreath Round Up

I love me some fall decor! And while I love seasonal decor, I'm also lazy. I want to decorate for fall but I don't want to have to swap out my fall decor until I'm ready to put up my Christmas stuff. Which means I like fall decor that is generic enough to last from September through the end of November - not anything too Halloween or Thanksgiving specific.

I showed you my current fall wreath a couple weeks ago but wanted to share a few of my other favorite fall wreaths from around the internet for your crafting (and in one case, purchasing) enjoyment...


Autumn Wreath from In His Grip
Judy from In His Grip crafted this fabulous fall wreath using burlap strips, jute twine and other scrappy embellishments. She shows you step-by-step what she did so you can make your own fabulously rustic looking monogram wreath for your door, too.

Ombre Effect Wreath on Every Creative Endeavor
Bev from Flamingo Toes shares a guest post over at Every Creative Endeavor for how to make this beautiful ombre rosette wreath. It's a complete tutorial including how to make the fabric rosettes and how to print on fabric (it's surprisingly easy) to make the cute little bunting.

$10 Fall Wreath from Shanty 2 Chic
Whitney from Shanty 2 Chic is due to have a baby any day now but it hasn't stopped her from crafting up a storm. This cute wreath is made from Hobby Lobby finds and looks super high end but cost less than $10! Love that! Go check out her tutorial and wish her luck with her new little bundle of baby.

Mossy Pumpkin Wreath from Etsy Seller TwoInspireYou
Want a super cute wreath but you're out of time with the Halloween frenzy coming up next week? Pop over to Etsy seller TwoInspireYou's shop and pick up this cute mossy wreath with little pumpkin accents and burlap ribbon hanger. Adorable!

I hope you guys enjoyed my fall wreath round up! If you love wreaths like I do, I'm always adding more to my wreath board over on Pinterest. Also.....if you were featured, please feel free to grab a button!


Carissa's Creativity Space
<a href="http://creativecarissa.blogspot.com" target="_blank"><img src="https://blogger.googleusercontent.com/img/b/R29vZ2xl/AVvXsEgChaYBjBvga5LJSOS7oeR72Ad1zcG7vjVtkoUNXp92XeDZBzizwZKv32LA7xXT4YekpsYYya1-yapcqIYo_9zqwA_Fnt6_NHuvG1Dawu3Qzpyu1iUaMJTShsc_3yD3r3zDcCo_nGHJcjg/s200/featured%252520button%252520200px%252520copy.jpg" alt="Carissa's Creativity Space" width="125" height="125" /></a>

Thursday, October 13, 2011

Easy Fall Wreath

I love Autumn. The gardener in me is a little sad that it's time to put my garden to bed for the winter (minus the   limited fall gardening I do). The crafter in me gets excited because now I can spend my gardening time doing fun fall and winter crafts.  Of course Fall has not officially begun until I hang a seasonal fall wreath on my door. So today I'm happy to announce...
Fall is Officially Here!


Thursday, October 6, 2011

How to Make Baby Cinnamon Rolls

Yesterday I told you about getting to meet Heather from Dollar Store Crafts at the premiere party for her new show, Get a Little Creative. And as you all know....a party isn't a party without great food!  The night before the party, I was stressing a little about what to bring because I needed to bring something either awesomely creative or super tasty....but I had no time to invest in making something awe-inspiring. I didn't have time to run to the store, either, which meant I needed to come up with something great using items I already had on hand. A tall order!

I remembered I had a roll of low fat crescent roll dough in the fridge and with some pantry staples figured I could gussy them up a bit to make something. A little of this and a little of that and these babies were born. And boy were they awesome!  They turned out even better than I had hoped. Plus they were easy and quick to make. I'm sure they will be making appearances at future potlucks and fall food events this year!


Monday, October 18, 2010

Fall Crafting

I'm such a bad blogger! I didn't realize how bad this blog has been neglected. In part because I've been blogging a bit...just not here. If you haven't checked it out yet, come visit my new blog: Not Really a Hippie which focuses more on parenting and family stuff. It's super new (I think I only have 3 posts) but will hopefully give me some space to write about mom stuff but leave this space free to talk about crafty things.

This fall I've been tackling some sewing projects. My mom is an A-mazing seamstress and has made all kind of fancy and beautiful dresses and projects. I sew mostly straight lines. BUT I have recently tackled some more advance projects. Wait. Who am I kidding? They are actually pretty non-advanced. They just involve some non-straight lines so I like to pretend. Ha!

Project #1: Baby Slings
I got an e-mail from a company I had previously bought a nursing cover from for a free baby sling on their new baby sling site. I've been wanting a baby sling so was more than thrilled to pay $12 shipping + handling to get a "free" sling. Bad news was that they didn't have any larger/taller sizes in and wouldn't until late November. Lame.

So...I got adventurous. I found a great tutorial on My Karma Baby about how to make a sling that looked simple enough. And even if I failed, I only lost 2 yards of fabric, right? I bought 2 yards of brown linen at Jo-Anns for about $8 and began.

Here's Joe wearing our son in his halloween costume (more on that in a minute):

The sling is a smidge big (I measured to the middle of my hip instead of the top of my hip) so we have to twist it to make it fit right when wearing him on our hip (Joe and I conveniently have the same shoulder-to-hip measurement).

I've since made 2 more: Once for my cousin Connie and her daughter and another for me that fits better. I just realized I don't really have good pictures of those, so I'll need to take some to put up later.


Project #2: Yoda Costume
We're on a tight Halloween budge this year, so we are making costumes. We already had some yoda feet socks (they are actually dinosaur socks) and brown clothes. We just needed a robe and a yoda hat.

The robe was pretty easy...fold a piece of cream flannel (1 yard on sale for $1.99) in half. Lay baby on the flannel, lining up shoulders with the fold. Trace around baby, leaving 2 inches or so of ease for the top and flaring out to a dress/robe shape at the bottom. Cut out around outline, adding additonal half-circle cut for neck and cutting a log slit of the front to make the robe. Hem sleeves and bottom. Sew 2 from cuff-to-bottom seams. Sew 1 inch strip folded in half all around robe opening to make a collar-type thing. Iron. Done.

For the hat, I traced around the outline of a hat he already has that fits well onto a paper bag to make a pattern. I used a 1/2 yard piece of green fleece to cut out the hat and make some big yoda ears to attach to the sides. Added some forehead wrinkles. Wha-la! Yoda costume for about $5.

EDITED TO ADD: In fact, I'm linking my yoda costume up over at the CSI project for their "$5 or less" project week
Visit thecsiproject.com


Project #3: Baby Pumpkin Hats
The third thing I did was make matching baby pumpkin hats for the babies coming to our family's annual fall party. I just realized I am short on pictures (and this post is getting pretty long as it is) so this will be a topic of a future post. If I get organized I might even be able to make a tutorial!

Here's a preview:


Better pics (and tutorial?) to come soon!

Monday, October 27, 2008

Fall is here

Part of why I have been such a blog slacker lately is because I get guilt for neglecting it.  I feel like I neglected my blog for so long that my next post better be awesome.  But I don't have anything awesome to post about so I don't post anything.  But then I feel guilty for not posting.  So then I feel like my next post needs to be awesome..... and it goes on and on.

So I'm giving up on trying to come up with witty, well-written, clever entries about the happenings of a knitting cupcaker and her family.  Instead, I think we're going to try the "short and sweet" approach.

So this is what I've got for today as a recap for October:

I made this yarn:

It's half fleece artist BFL and half purple corriedale.  In the end, it give me 98 g (about 64 yards) of bulky weight yarn.  I want to do mittens but I don't know if I have enough.


I made most of a sweater:
It's a modified version of Star-Cross'd Love.  Pattern was originally a size small, I'm making it a L/XL.  Looks good so far.  Need some sleeves and to add a bit of length to the collar.  If you're a Raveler, my pattern page lives here.


I dyed some new roving for my shop:

It's a new Cupcake Factory line called "Confection" and it lives here


I made these:
The little ones are chocolate cakes baked in Pampered Chef prep bowls.  The big ones is yellow cake w/ halloween sprinkles (funfetti-syle) and baked in a PC small batter bowl.  Little stems are mint candies.  Large stem is molded lime tootsie rolls.


I went here:

And did this:


Oh!  And because Melody asked so nice, here is a gratuitous dog picture:


Design by Free WordPress Themes | Bloggerized by Lasantha - Premium Blogger Themes | Facebook Themes