Showing posts with label crafts. Show all posts

Monday, January 21, 2013

Valentine's Gallery Art Wall (and free printable)

Until recently, I have not been one for "themed" Valentine's decor. In fact, I normally don't decorate for Valentine's Day and opt for cranberry colored winter berry decor to last from Christmas until Spring. This year, though, I have been loving book page crafts (it all started with my book page pumpkins) and decided I wanted book pages and red hearts to be my 2013 Valentine's Day theme. Considering our level of book nerdiness and the size of our library, books are especially appropriate for us.

I have a narrow wall in our downstairs half bath that was more than ready for an art update. I picked up 5 frames from the dollar store (2 8x10 size and 3 5x7 size) and got to work.

Supplies
  • Frames (2 of 8x10 size and 3 of 5x7 size)
  • Old book
  • Glue
  • Red construction paper
  • Printer
  • Cardstock
  • Poster board ($0.50 from Dollar Tree for a huge piece)
  • Permanent marker
  • Embroidery thread
  • Paint and paint brushes
Painted Heart
To make this one, I glued down several pages to the back of the default image paper than came in the frame.  Once it was dry, I painted a heart with watered down red acrylic paint and added some black accents. I like that the heart is see through and you can still see the words on the back side.


Cut Out "Specimen" Hearts
For this one, I printed out the lyrics of the song that was sung at our wedding (A Page is Turned by Bebo Norman - totally ties into the book nerd theme!) onto a piece of cardstock and used it for a mat. I cut some extra hearts out of the lyrics and glued them down onto a piece of red construction paper with some colored hearts (I decided on black for contrast). 


Song Lyrics Tree
This was inspired by this pin. Sadly, there is no original source - it just points to a tumblr blog. Let this be a lesson - if you're a blogger, watermark your stuff! That way if you picture becomes unmatched from the source people can find you. But I digress. The tree is another piece of cardstock with the Page is Turned lyrics on it. Then I tied red hearts onto the branch with embroidery floss. Mine is admittedly not nearly as pretty as the original but I still like it.


Pop Out Heart Art
This was inspired by this 3D Butterfly Art. I turned a book page sideways and drew hearts on the back. I cut around most of the edge, leaving a core in the middle to keep the heart attaached when folding up the sides. I slipped a piece of red construction paper in behind it and put it in the frame in front of the glass.


Printed Branch with Hearts
To make this one, I cut a piece of book paper to 5x7 and then told my printer to print the graphic as if it were a 5x7 photo. I should have reduced the amount of ink it used because it did take a little while to dry but I really like how it looks. 

If you like it, I'm sharing my printable graphic with you guys. You can try printing it on a book page like I did or onto regular cardstock for use in your valentine crafting. Click here to download the full size heart branch graphic for printing.


Thanks for stopping by!


Thursday, January 3, 2013

2012 Year in Review


I can hardly believe 2013 is already here! Is it just me, or did this year whip by? Thanks for joining me on the journey and tuning in for some creative green living ideas. These were my top 10 most popular posts from 2012. Did your favorite make it on the list?

I made this play kitchen from an old entertainment center for my son. It was originally going to be Christmas present in 2011 but it became a new year's present in 2012 instead. This won the number one spot by a landslide. Check it out if you want to build one: I break the process down for you.


When the price of peanut butter threatened to sky rocket, I was glad to find roasted peanuts on sale and stocked up so I could ride out 2012 with homemade peanut butter. It is super easy and a great way to save money and reduce the amount of junk in your food, too!


#3: Free Photo Christmas Card Templates
What makes this even more remarkable is that this post only had 6 weeks to collect pageviews to win the number 3 spot. Who knew photo card templates would be so popular! I'll be sure to make new ones in 2013, starting with some Valentine's Day cards later this month.


#4: Grow Your Own Easter Grass
This is one of my favorite ways to green your Easter. It's easy, fun and is a great science lesson for the kiddos, too. It takes about a week to grow a basket full of grass.


#5: Easy Glittered Bulb Ornaments
Everyone loves an easy craft project! These bulb ornaments take just a few minutes to make and can be done with inexpensive materials.


Earlier this year I was on a mission to make my own bread that was great for sandwiches (most recipes I'd tried to that point were a little stiff and crumbly or great for soup but not for sandwiches). This bread is amazing. The addition of the vital gluten makes it nice and soft and elastic.


Making yogurt at home is actually very easy and a great way to save money - especially if your family goes through yogurt like mine does! You can even make small personal sized yogurts by pre-packing chopped frozen fruit, a squirt of agave or honey and the fresh yogurt into small jars.

.
Don't toss your old rainboots when they start to crack from wear: dress them up with some cute patterned duct tape instead.


When I ended up with almost 200 pounds of zucchini from my garden, we needed to find some ways to use them up. This was a great kid-friendly way to serve zucchini in cheesy, bite sized tots.


I made these footprint towels as a gift for my son's grandmother. Little baby feet make adorable bases for both butteflies and bees on flour sack towels.

Thursday, December 1, 2011

Easy Upcycled Sugar Jar


This is a pretty simple project...but sometimes those are the best kind. It's not elaborate or fancy but fills a need and looks cute doing it. PLUS I had everything I needed on-hand so it was a zero-cost craft. Love that!

A couple weeks ago my church ran out of sugar on Sunday morning for the table with coffee. Yikes! One cool thing about my church is that it's smaller and so every pitches in to make things happen. A call was put out on facebook to see if anyone could grab more sugar canisters (kind of like these:)
...which is what we'd been using. They are admittedly un-cute. Plus the store name dropped in the post where more of these was available to purchase wasn't anywhere near my house. But come Saturday night nobody else had stepped up to volunteer to bring sugar. I had plenty of sugar at home....just not in a canister or other cute container that can sit out on the table.

What I did have, however, is a collection of glass jars that I like to use for crafts or storing leftovers. I went to my glass jar stash and found this baby which use to house organic apple sauce from Trader Joe's:
Perfect! Now it just needed a label. I pulled up Microsoft word on my computer and found a font I liked called "constantia".
Leaving it up on the screen of my computer, I grabbed a sharpie and free handed the letters onto the glass. I could have printed it off, taped it inside the jar and traced it....but I didn't want to chance waking up my sleeping kiddo (the printer is about 10 feet from the door to his room). I think it turned out alright:


Easy peasy! The lid screws on tight for storage plus this will be easier to refill (and cost way less to refill) than the disposable canisters we were using before. Green, frugal, free....it just doesn't get much better!

I'm sharing with these great parties. Come join the fun!
* Creative Juice Thursday at Momnivore's Dilemma * Hookin Up with HoH at House of Hepworths * Crafty Soiree at Yesterday on Tuesday * DIY Thrifty Thursday at Thrifty 101 * Lil' Luna Link Party at Lil' Luna * Show Off Your Stuff Party at Fireflies and Jellybeans * Show and Tell with Blue Cricket Design * Transformation Thursday at The Shabby Creek Cottage * Flaunt it Friday at Chic on a Shoestring  * Weekend Show Off Party at Ladybird Lane * Frugal Friday at The Shabby Nest *

Monday, November 14, 2011

Join me at the CSI Project!

I'm so excited to say that today I'm sharing my tutorial for how to dye yarn in your crock pot over at the CSI Project!

See this yarn?  Made it in my crock pot!
(okay....techincally, I bought the yarn. I did, however dye it in my crockpot)

I have always been inspired by The CSI Project so it's a real honor to help them kick off Slow Cooker Recipes and Crafts week with my tutorial. If you are unfamiliar, make sure you add them to your blog roll! They have a different themed challenge every week where they feature 3 different tutorials (Monday, Tuesday and Wednesday) and then on Thursday, they host a link party where you can link your blogged projects and enter to win great prizes!

If you would like to learn the ways of crockpot yarn dying ninjas, please join me over at the CSI Project today!
Visit thecsiproject.com

Monday, July 4, 2011

Happy Fourth!

This year is just flying by! I feel like I just brought my little man home from the hospital a few weeks ago and now this week he has launched himself into full-fledged toddlerhood by walking all by himself. Everywhere. Proud of you, little guy!

Speaking of letting the year get away from me, I finally finished my Fourth of July / Summer wreath for our front door last night.  I saw an idea that I loved over at Pickup Some Creativity and ran with it. I already had an identical wreath form from the Dollar Tree so I picked up some material to make the bunting (I didn't have much in the way of red, white or blue scraps). I didn't pink the edges because simply by cutting the fabric on the bias, you keep it from unraveling.  I cut out three different sizes of pennants and sandwiched them into some double fold bias tape. I added a little chalkboard hanging from red ribbon and covered my front door's wreath hanger with red ribbon for festive flair.


Saturday, March 5, 2011

Countdown to Spring: Front Door Decor


Only 16 more days until the first day of spring!  I'm so excited to bust out some awesome spring green decor to cheer up my home.  I've been seeing some fab wreaths around the blogosphere lately and wanted to highlight a few of my faves. Each of the wreaths I found come with tutorials, so read the rest to grab the links and whip up some fabulous front door decor yourself!

Sunday, January 30, 2011

Oven Mitt Cuteness

I know I said in my last blog post that I almost made this really awesome double oven mitt from Smashed Peas and Carrots. But then I did:


The only thing I did differently was that I added a layer of insulbrite between the 2 top mitt layers of fabric.

As usual (this is becoming a trend), it took a few hours longer than originally anticipated to make. BUT it was also the first time I used bias tape properly (when I made this project I had no idea what I was doing and just kind of folded it over the edge and tried to hold it all together and sew it down all at once.

I'm happy with it. I think it turned out super cute. I ended up giving it away as a birthday present but I think I need to make another one for me.

Monday, January 17, 2011

Dollar Store Christmas: Footwarmer

Frugal Gift 2: Footwarmer

The husband of this gift recipient is being deployed to Iraq for a year with the army. She's a pretty skinny person and always cold, so when I saw the tutorial for how to make a "hot one" as the author called it, I knew it would be perfect.

"Dollar Store" Christmas Round Up

This year has definitely been a financially challenging one for us. My husband was laid off in January, we had a baby in May which involved a mostly unpaid maternity leave as well as huge leftover medical bills. God has been faithful throughout and we have always been able to pay our mortgage even if it had to be a little late.

But what to do for Christmas? I love giving gifts to people but our budget really didn't have any wiggle room in it to make normal gifts happen. We usually try to do homemade gifts, but this year was going to be a bit more extreme...homemade and inexpensive with an attempted budget of $3 or less per gift. Enter Dollar Store Crafts run by the fabulous Heather. Heather specializes in cheap and fabulous crafts made from dollar store (or other inexpensively acquired) finds. While all the gifts we did this year weren't necessarily from her site, Dollar Store Crafts was definitely my inspiration for this year's frugal crafting Christmas.

Monday, August 16, 2010

Crafty Project Want-To-Make Roundup

I've seen quite a few blog posts lately with some super fun crafts that I can't wait to make. Here are my three faves from this last week:

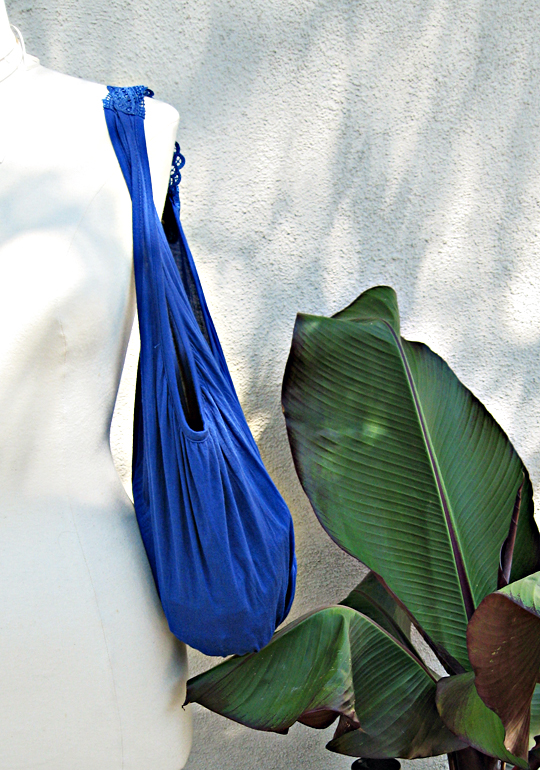
Repurpose a Tank Top to Make a Fun Bag

Do you have old tank tops that you're just not feeling anymore? Tired of your purses but don't have money to buy a new one? This project is so easy even the most non-crafty crafter wannabes will be able to pull it off. Check it out here.


Make Cool Jewelry From Sea Glass
Gail's tutorial on Can't Stop Making Things makes these fancy and intimidating-looking pendants look super easy to make. I think these would make great gifts. Get your Christmas crafting started now!


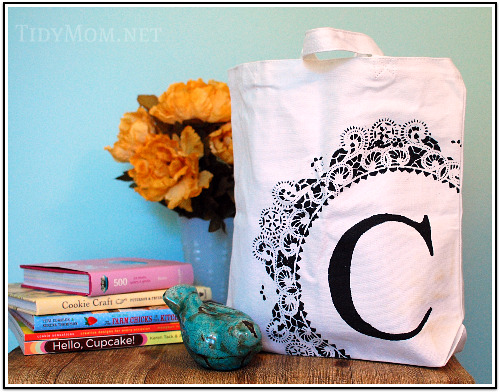
Stenciled Canvas Bag

This project uses a paper doily as a stencil. Stenciling normally makes me yawn, but I really thing this bag is super cool looking. I can think of several people who this would make the perfect gift for. Check out the tutorial on TidyMom's website here.


Do any of these appeal to you, too? Have you found any sweet craft ideas lately that you can't wait to try? I'd love to hear your thoughts!

Showing posts with label crafts. Show all posts

Monday, January 21, 2013

Valentine's Gallery Art Wall (and free printable)

Until recently, I have not been one for "themed" Valentine's decor. In fact, I normally don't decorate for Valentine's Day and opt for cranberry colored winter berry decor to last from Christmas until Spring. This year, though, I have been loving book page crafts (it all started with my book page pumpkins) and decided I wanted book pages and red hearts to be my 2013 Valentine's Day theme. Considering our level of book nerdiness and the size of our library, books are especially appropriate for us.

I have a narrow wall in our downstairs half bath that was more than ready for an art update. I picked up 5 frames from the dollar store (2 8x10 size and 3 5x7 size) and got to work.

Supplies
  • Frames (2 of 8x10 size and 3 of 5x7 size)
  • Old book
  • Glue
  • Red construction paper
  • Printer
  • Cardstock
  • Poster board ($0.50 from Dollar Tree for a huge piece)
  • Permanent marker
  • Embroidery thread
  • Paint and paint brushes
Painted Heart
To make this one, I glued down several pages to the back of the default image paper than came in the frame.  Once it was dry, I painted a heart with watered down red acrylic paint and added some black accents. I like that the heart is see through and you can still see the words on the back side.


Cut Out "Specimen" Hearts
For this one, I printed out the lyrics of the song that was sung at our wedding (A Page is Turned by Bebo Norman - totally ties into the book nerd theme!) onto a piece of cardstock and used it for a mat. I cut some extra hearts out of the lyrics and glued them down onto a piece of red construction paper with some colored hearts (I decided on black for contrast). 


Song Lyrics Tree
This was inspired by this pin. Sadly, there is no original source - it just points to a tumblr blog. Let this be a lesson - if you're a blogger, watermark your stuff! That way if you picture becomes unmatched from the source people can find you. But I digress. The tree is another piece of cardstock with the Page is Turned lyrics on it. Then I tied red hearts onto the branch with embroidery floss. Mine is admittedly not nearly as pretty as the original but I still like it.


Pop Out Heart Art
This was inspired by this 3D Butterfly Art. I turned a book page sideways and drew hearts on the back. I cut around most of the edge, leaving a core in the middle to keep the heart attaached when folding up the sides. I slipped a piece of red construction paper in behind it and put it in the frame in front of the glass.


Printed Branch with Hearts
To make this one, I cut a piece of book paper to 5x7 and then told my printer to print the graphic as if it were a 5x7 photo. I should have reduced the amount of ink it used because it did take a little while to dry but I really like how it looks. 

If you like it, I'm sharing my printable graphic with you guys. You can try printing it on a book page like I did or onto regular cardstock for use in your valentine crafting. Click here to download the full size heart branch graphic for printing.


Thanks for stopping by!


Thursday, January 3, 2013

2012 Year in Review


I can hardly believe 2013 is already here! Is it just me, or did this year whip by? Thanks for joining me on the journey and tuning in for some creative green living ideas. These were my top 10 most popular posts from 2012. Did your favorite make it on the list?

I made this play kitchen from an old entertainment center for my son. It was originally going to be Christmas present in 2011 but it became a new year's present in 2012 instead. This won the number one spot by a landslide. Check it out if you want to build one: I break the process down for you.


When the price of peanut butter threatened to sky rocket, I was glad to find roasted peanuts on sale and stocked up so I could ride out 2012 with homemade peanut butter. It is super easy and a great way to save money and reduce the amount of junk in your food, too!


#3: Free Photo Christmas Card Templates
What makes this even more remarkable is that this post only had 6 weeks to collect pageviews to win the number 3 spot. Who knew photo card templates would be so popular! I'll be sure to make new ones in 2013, starting with some Valentine's Day cards later this month.


#4: Grow Your Own Easter Grass
This is one of my favorite ways to green your Easter. It's easy, fun and is a great science lesson for the kiddos, too. It takes about a week to grow a basket full of grass.


#5: Easy Glittered Bulb Ornaments
Everyone loves an easy craft project! These bulb ornaments take just a few minutes to make and can be done with inexpensive materials.


Earlier this year I was on a mission to make my own bread that was great for sandwiches (most recipes I'd tried to that point were a little stiff and crumbly or great for soup but not for sandwiches). This bread is amazing. The addition of the vital gluten makes it nice and soft and elastic.


Making yogurt at home is actually very easy and a great way to save money - especially if your family goes through yogurt like mine does! You can even make small personal sized yogurts by pre-packing chopped frozen fruit, a squirt of agave or honey and the fresh yogurt into small jars.

.
Don't toss your old rainboots when they start to crack from wear: dress them up with some cute patterned duct tape instead.


When I ended up with almost 200 pounds of zucchini from my garden, we needed to find some ways to use them up. This was a great kid-friendly way to serve zucchini in cheesy, bite sized tots.


I made these footprint towels as a gift for my son's grandmother. Little baby feet make adorable bases for both butteflies and bees on flour sack towels.

Thursday, December 1, 2011

Easy Upcycled Sugar Jar


This is a pretty simple project...but sometimes those are the best kind. It's not elaborate or fancy but fills a need and looks cute doing it. PLUS I had everything I needed on-hand so it was a zero-cost craft. Love that!

A couple weeks ago my church ran out of sugar on Sunday morning for the table with coffee. Yikes! One cool thing about my church is that it's smaller and so every pitches in to make things happen. A call was put out on facebook to see if anyone could grab more sugar canisters (kind of like these:)
...which is what we'd been using. They are admittedly un-cute. Plus the store name dropped in the post where more of these was available to purchase wasn't anywhere near my house. But come Saturday night nobody else had stepped up to volunteer to bring sugar. I had plenty of sugar at home....just not in a canister or other cute container that can sit out on the table.

What I did have, however, is a collection of glass jars that I like to use for crafts or storing leftovers. I went to my glass jar stash and found this baby which use to house organic apple sauce from Trader Joe's:
Perfect! Now it just needed a label. I pulled up Microsoft word on my computer and found a font I liked called "constantia".
Leaving it up on the screen of my computer, I grabbed a sharpie and free handed the letters onto the glass. I could have printed it off, taped it inside the jar and traced it....but I didn't want to chance waking up my sleeping kiddo (the printer is about 10 feet from the door to his room). I think it turned out alright:


Easy peasy! The lid screws on tight for storage plus this will be easier to refill (and cost way less to refill) than the disposable canisters we were using before. Green, frugal, free....it just doesn't get much better!

I'm sharing with these great parties. Come join the fun!
* Creative Juice Thursday at Momnivore's Dilemma * Hookin Up with HoH at House of Hepworths * Crafty Soiree at Yesterday on Tuesday * DIY Thrifty Thursday at Thrifty 101 * Lil' Luna Link Party at Lil' Luna * Show Off Your Stuff Party at Fireflies and Jellybeans * Show and Tell with Blue Cricket Design * Transformation Thursday at The Shabby Creek Cottage * Flaunt it Friday at Chic on a Shoestring  * Weekend Show Off Party at Ladybird Lane * Frugal Friday at The Shabby Nest *

Monday, November 14, 2011

Join me at the CSI Project!

I'm so excited to say that today I'm sharing my tutorial for how to dye yarn in your crock pot over at the CSI Project!

See this yarn?  Made it in my crock pot!
(okay....techincally, I bought the yarn. I did, however dye it in my crockpot)

I have always been inspired by The CSI Project so it's a real honor to help them kick off Slow Cooker Recipes and Crafts week with my tutorial. If you are unfamiliar, make sure you add them to your blog roll! They have a different themed challenge every week where they feature 3 different tutorials (Monday, Tuesday and Wednesday) and then on Thursday, they host a link party where you can link your blogged projects and enter to win great prizes!

If you would like to learn the ways of crockpot yarn dying ninjas, please join me over at the CSI Project today!
Visit thecsiproject.com

Monday, July 4, 2011

Happy Fourth!

This year is just flying by! I feel like I just brought my little man home from the hospital a few weeks ago and now this week he has launched himself into full-fledged toddlerhood by walking all by himself. Everywhere. Proud of you, little guy!

Speaking of letting the year get away from me, I finally finished my Fourth of July / Summer wreath for our front door last night.  I saw an idea that I loved over at Pickup Some Creativity and ran with it. I already had an identical wreath form from the Dollar Tree so I picked up some material to make the bunting (I didn't have much in the way of red, white or blue scraps). I didn't pink the edges because simply by cutting the fabric on the bias, you keep it from unraveling.  I cut out three different sizes of pennants and sandwiched them into some double fold bias tape. I added a little chalkboard hanging from red ribbon and covered my front door's wreath hanger with red ribbon for festive flair.


Saturday, March 5, 2011

Countdown to Spring: Front Door Decor


Only 16 more days until the first day of spring!  I'm so excited to bust out some awesome spring green decor to cheer up my home.  I've been seeing some fab wreaths around the blogosphere lately and wanted to highlight a few of my faves. Each of the wreaths I found come with tutorials, so read the rest to grab the links and whip up some fabulous front door decor yourself!

Sunday, January 30, 2011

Oven Mitt Cuteness

I know I said in my last blog post that I almost made this really awesome double oven mitt from Smashed Peas and Carrots. But then I did:


The only thing I did differently was that I added a layer of insulbrite between the 2 top mitt layers of fabric.

As usual (this is becoming a trend), it took a few hours longer than originally anticipated to make. BUT it was also the first time I used bias tape properly (when I made this project I had no idea what I was doing and just kind of folded it over the edge and tried to hold it all together and sew it down all at once.

I'm happy with it. I think it turned out super cute. I ended up giving it away as a birthday present but I think I need to make another one for me.

Monday, January 17, 2011

Dollar Store Christmas: Footwarmer

Frugal Gift 2: Footwarmer

The husband of this gift recipient is being deployed to Iraq for a year with the army. She's a pretty skinny person and always cold, so when I saw the tutorial for how to make a "hot one" as the author called it, I knew it would be perfect.

"Dollar Store" Christmas Round Up

This year has definitely been a financially challenging one for us. My husband was laid off in January, we had a baby in May which involved a mostly unpaid maternity leave as well as huge leftover medical bills. God has been faithful throughout and we have always been able to pay our mortgage even if it had to be a little late.

But what to do for Christmas? I love giving gifts to people but our budget really didn't have any wiggle room in it to make normal gifts happen. We usually try to do homemade gifts, but this year was going to be a bit more extreme...homemade and inexpensive with an attempted budget of $3 or less per gift. Enter Dollar Store Crafts run by the fabulous Heather. Heather specializes in cheap and fabulous crafts made from dollar store (or other inexpensively acquired) finds. While all the gifts we did this year weren't necessarily from her site, Dollar Store Crafts was definitely my inspiration for this year's frugal crafting Christmas.

Monday, August 16, 2010

Crafty Project Want-To-Make Roundup

I've seen quite a few blog posts lately with some super fun crafts that I can't wait to make. Here are my three faves from this last week:

Repurpose a Tank Top to Make a Fun Bag

Do you have old tank tops that you're just not feeling anymore? Tired of your purses but don't have money to buy a new one? This project is so easy even the most non-crafty crafter wannabes will be able to pull it off. Check it out here.


Make Cool Jewelry From Sea Glass
Gail's tutorial on Can't Stop Making Things makes these fancy and intimidating-looking pendants look super easy to make. I think these would make great gifts. Get your Christmas crafting started now!


Stenciled Canvas Bag

This project uses a paper doily as a stencil. Stenciling normally makes me yawn, but I really thing this bag is super cool looking. I can think of several people who this would make the perfect gift for. Check out the tutorial on TidyMom's website here.


Do any of these appeal to you, too? Have you found any sweet craft ideas lately that you can't wait to try? I'd love to hear your thoughts!

 
Design by Free WordPress Themes | Bloggerized by Lasantha - Premium Blogger Themes | Facebook Themes